|
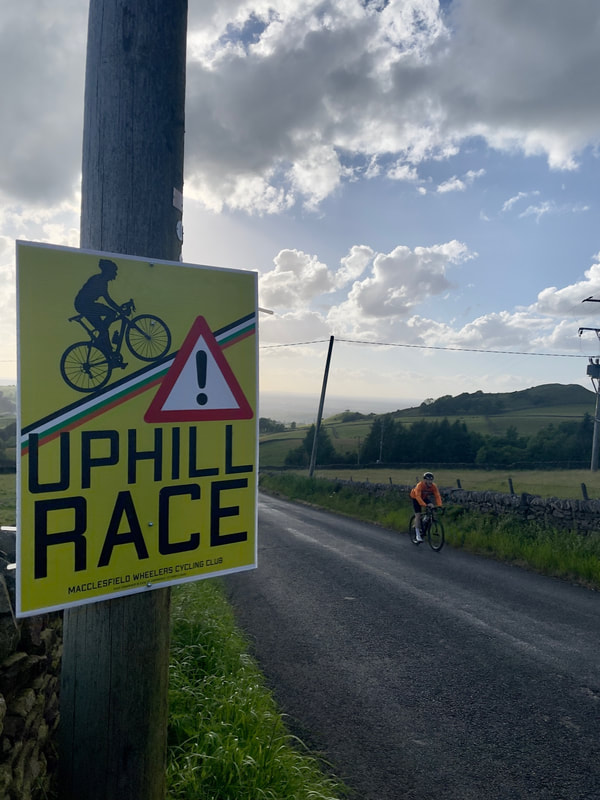
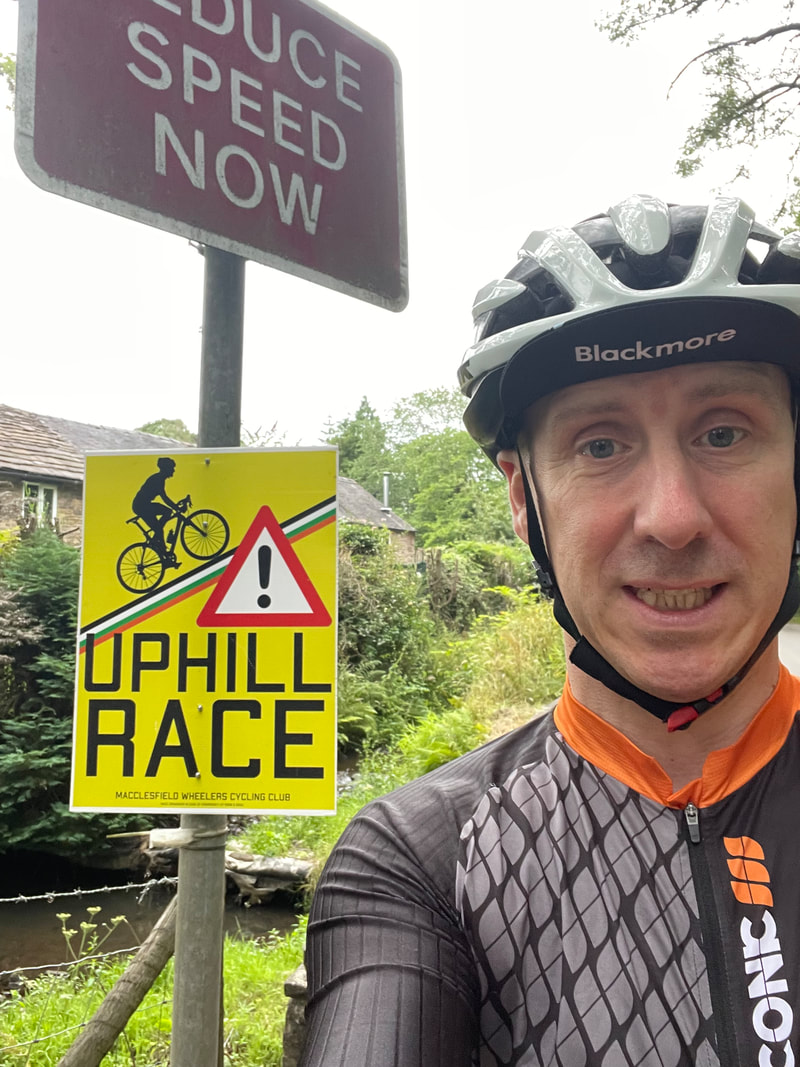
Living on the edge of the Peaks it’s impossible to avoid hills on pretty much any ride. At some point you’ll hit a 10% gradient that feels like it’s a slog. In fact, one of my usual routes before I’ve even hit the “hills” I’ll have climbed 150m to get there. That said, I wouldn’t class myself as a climber, certainly not quick I tend to grind my way to the top spurred on by knowing there could be a breakfast at the top of the opportunity to bomb down the hill on the other side. But this year, with a change of jobs meaning the commute by bike was off the cards, I’ve found my mileage seriously drop and lethargy levels increase. So, I decided it was time to find a new challenge. I reiterate I’m no more of a climber than anyone else that can ride a bike, but when I saw a few images of people smiling after doing the Macc Wheelers organised race, I decided to bite the bullet and invest £6 into my fitness goals. I seem to recall messaging Bhima coordinating these climbs (alongside Roger and a small group of volunteers) saying that I wasn’t expecting much and I much more comfortable doing longer rides than short efforts. I think his response was “some of our best climbers are endurance riders”, it became apparent I was not one of them!!
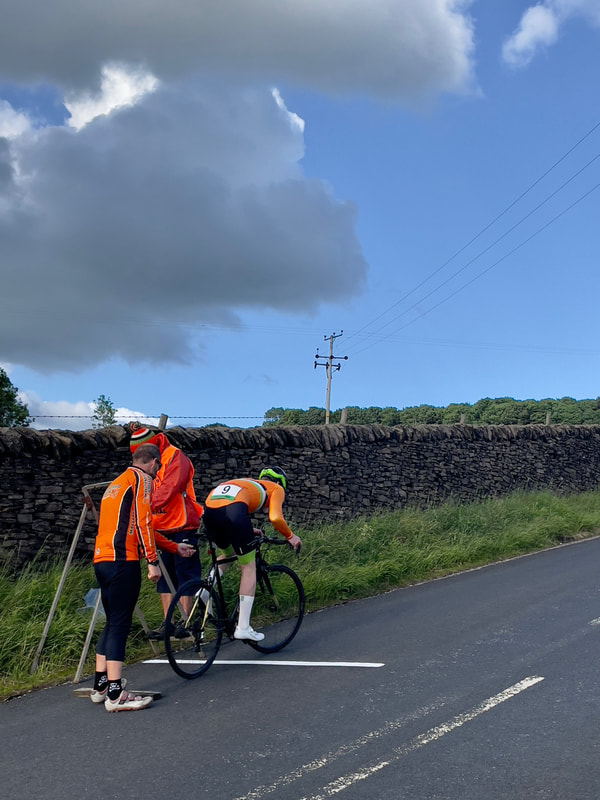
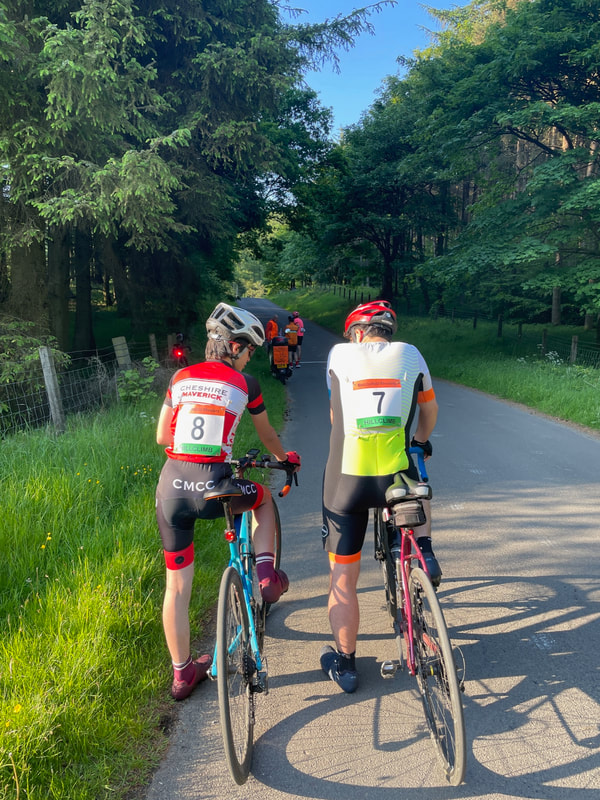
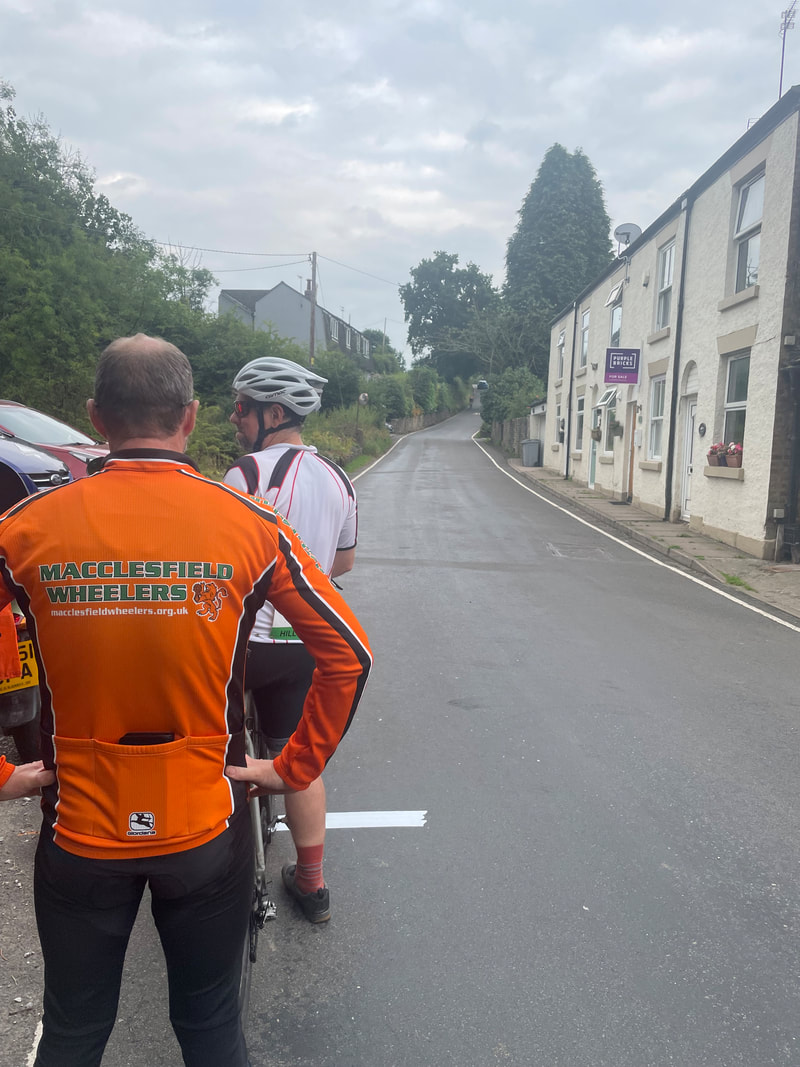
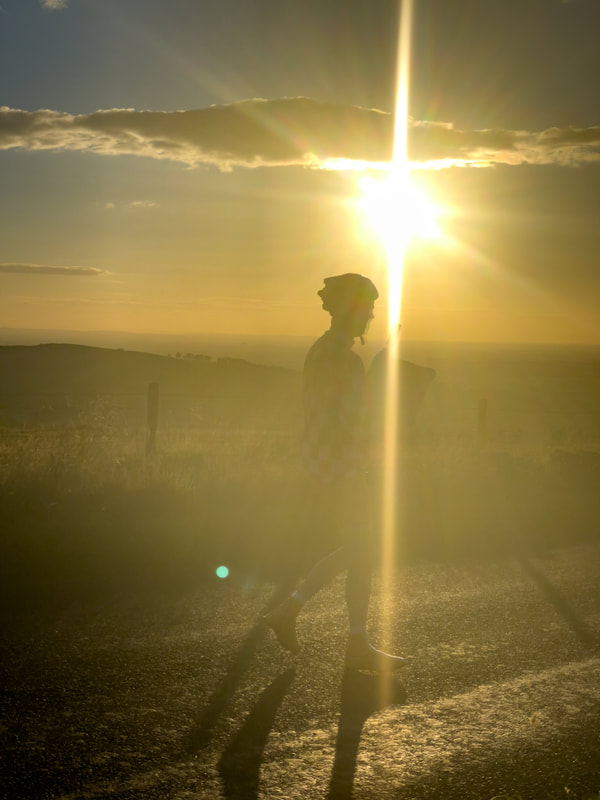
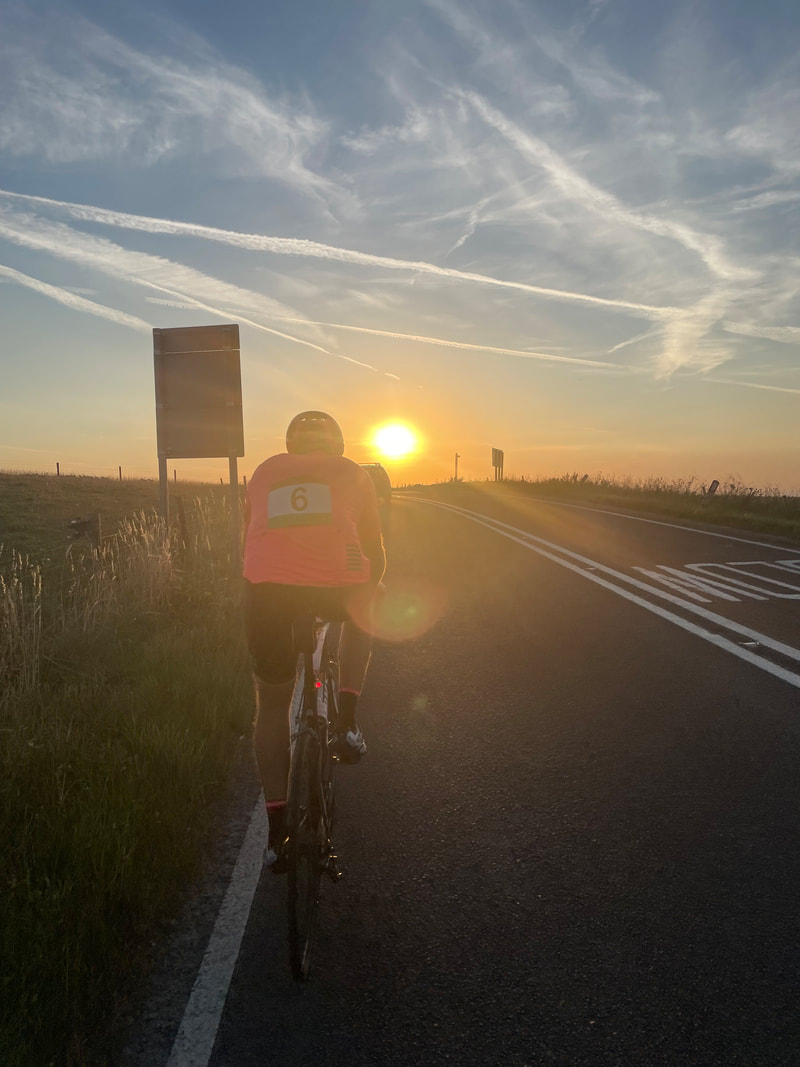
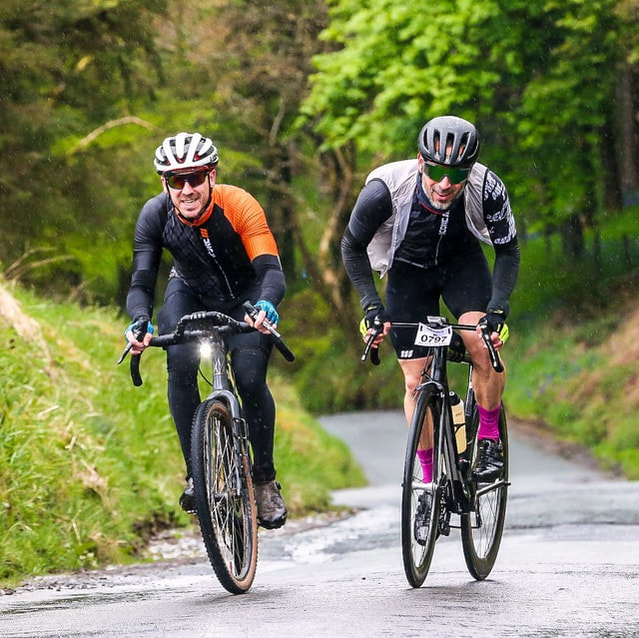
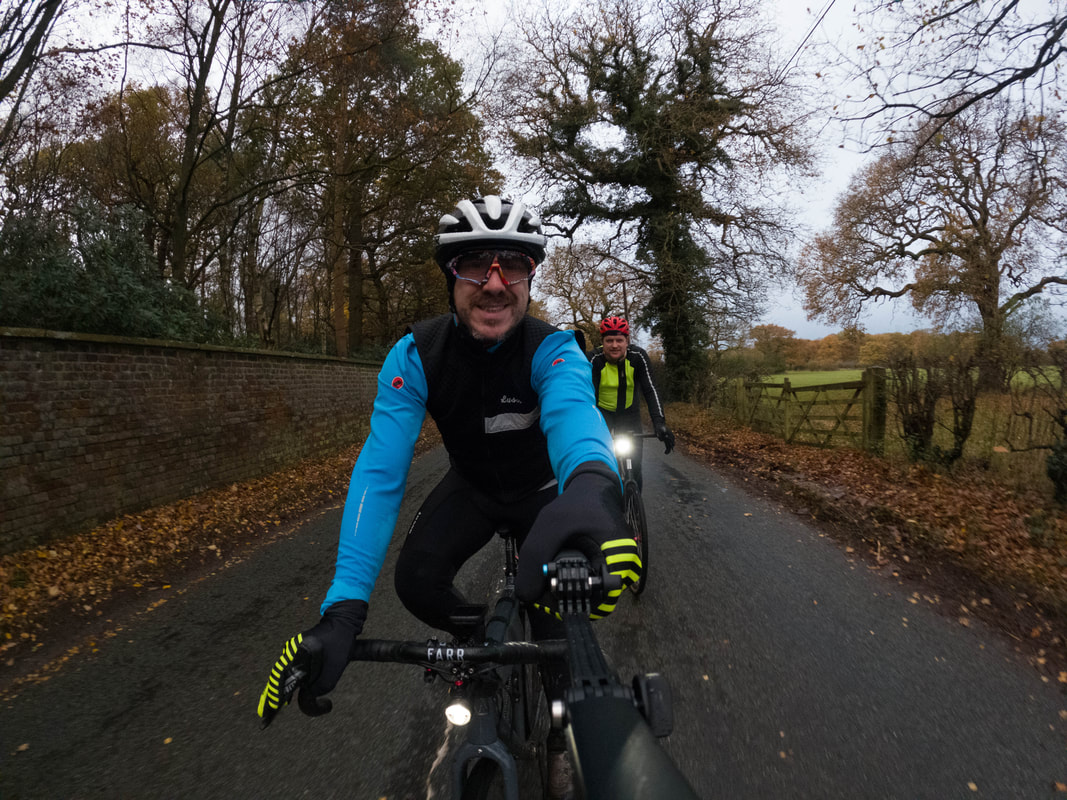
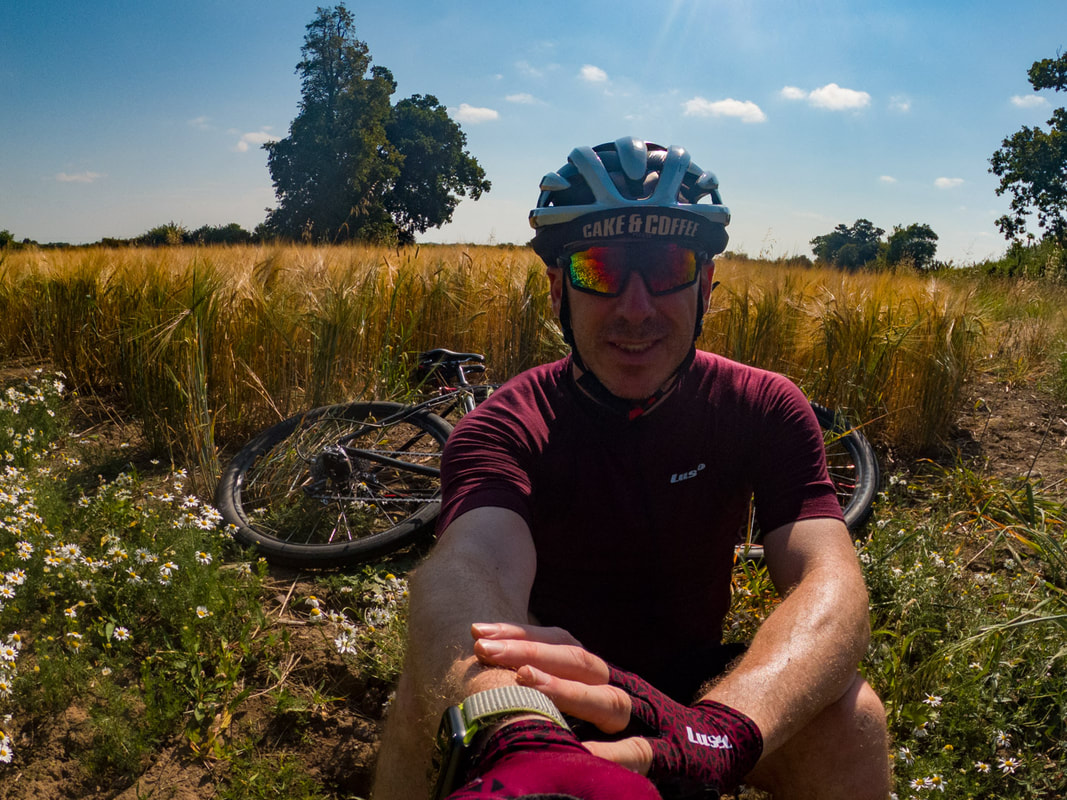
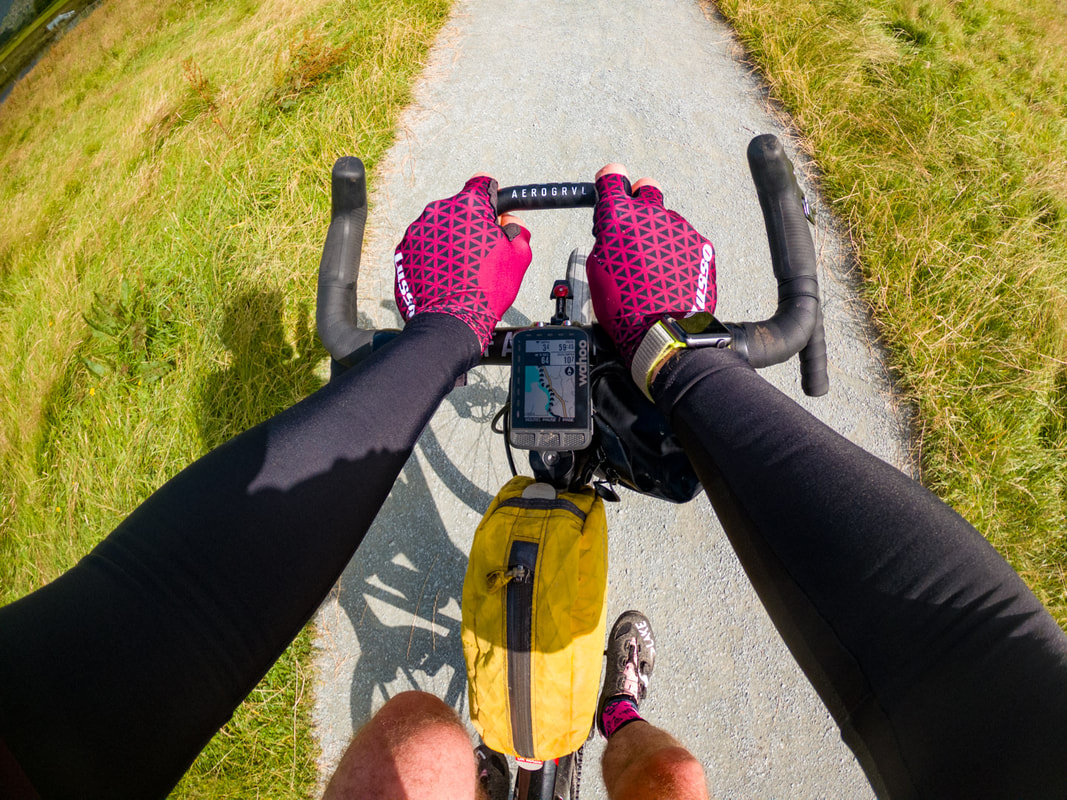
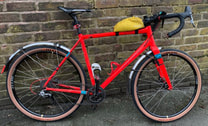
So, the first climb, Blaze Hill, 2.1km 162m, I roll up way to early having taken the gravel route there, was instantly greeted by Bhima, got my number pinned it on and then waited. Not awkwardly though there was some nice chit chat, I’ve not ridden with Macc Wheelers for several years and none of my core group of cyclist friends had entered (yet) so it wasn’t the clique I had nervously been anticipating, there were the cursory glances at bikes, requested to pin numbers those kinds of things but all pretty relaxed. Then someone did turn up that I recognised. I didn’t know it then but it turned out he is my nemesis @windydave . We cycling to the start, me starting 10 and Dave 9, I had someone to chase, every commuter’s dream!! So off Dave went, and I rolled up to the start. As Snowden grabbled my bike to hold me in place and I fumbled around to try and work out which pedal I want to have forward (I’ve still not worked it out) just before the countdown starts he say, this is the heaviest bike I’ll hold tonight. He was right, I had a full water bottle, three cargo mounts, a tool kit and GoPro strapped to the front, that along with 650b x47 c tyres – in hill climb terms approximately 33 seconds of worth of time. As the last beep went off, I set off, all power down pushing up the hill as quick as possible and at one point I was catching the person in front, Blaze hill goes steep, not steep, steep. I peaked mid first steep. As Dave started to pull away, I pushed a bit harder. I had anticipated that the Hill Climb would be a lonely affair bit it wasn’t, there were people at various point along the 2km stretch cheering you on, shouting encouragement, cow bells ringing, it was genuinely a really nice experience, distracting me from the burning legs and my own the heavy breathing. I reached the top and keen to know my time 9 min 36 seconds. I was pleased it was a PB for me up the hill and I knew I had pushed as I hurt, the somewhat unpleasant feeling of pulsing teeth and a metallic taste, but I’d done it, I’d pushed as hard as I think I could do, and to be honest, it’s an experience I had not felt in a long time. Testing how far I could push myself is a good feeling. Dave had come in 32 seconds faster clocking in a time of 9mins 34. Winners Fastest Male – 5:28 Fastest Female – 6:49
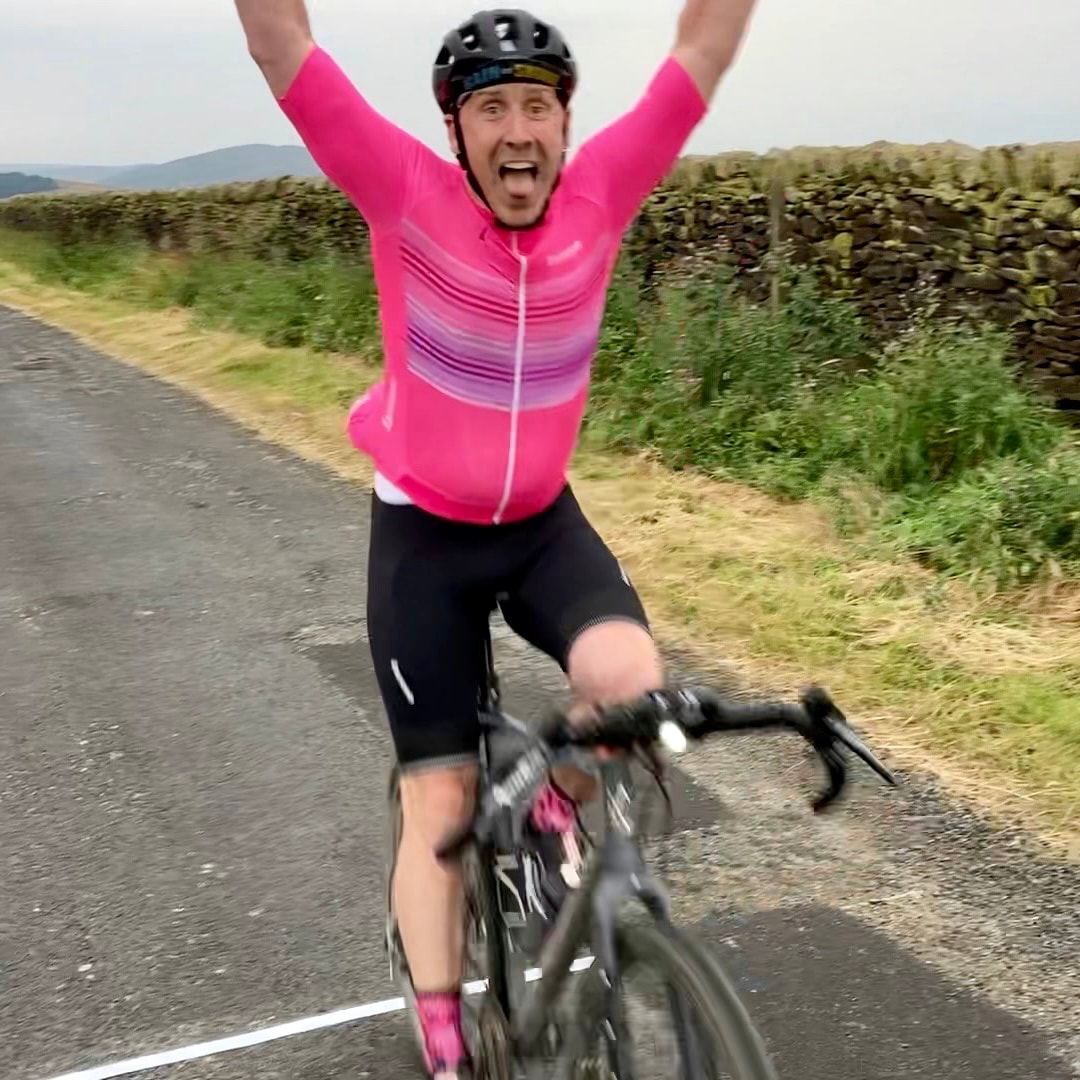
I’ve completed 9 races now and of those I’ve hit 8 Persona Bests and for me that’s the key achievement, I’m well aware that I’m not going to be up there at the top of the timesheets, but I keep coming back because the camaraderie other than the banter with my Nemesis which is all in good spirits it’s such a positive experience from the banter at the start, the cheers along the way and the motivation to push to the line is such a great experience. Of course, if I had a lighter bike, if I had shed a few kgs if I’d prepared a bit more, I could be further up the rankings, but I’ve got a set of PBs and @windydave to chase and that’s enough for me. I’m sure the couple of people who sit behind me on the leader board are thinking I want to catch Mike, but ultimately when you get to the top having pushed as hard as you can, if you’ve won or lost you’ve got the top as quick as you can, you’re likely feeling the same as the person who may have done it 5-10mins quicker than you and that counts, because regardless of speed the push to your limit is your limit. I am certain that I’ll be “competing” next year and if the Gravel Hill climb season starts this winter I’m up for that too, I’ve found the Hill Climb project to be a very entertaining and welcoming series, and if there is a series near you, go give it a shot other than a couple of £s you have nothing to lose, and probably some PBs to best. As an aside Bhima has some great write ups and having seen some of his photos there should be some corkers to come, the organisation, notification and follow through by Macc Wheels has been hands down the best I’ve experienced, so if you’re local to Macclesfield seriously give it consideration next time, you won’t’ be disappointed. Yes you could probably do that on your trainer and get a bit of satisfaction from the ride ons as you climb a virtual mountain, but it’s much hard to stop when you’ve got people there cheering you on. Overall, I’ve finished ... well that doesn't really matter but lets just say i've taken minutes off pretty much every PB I had on the climbs round here. If you're interested in signing up for future races go check out https://hillclimbproject.co.uk/2022/ and you can also have a look at the times the superhuman men and women and young adults did too.
0 Comments
Pedals, right, super exciting topic, there are way too many varieties, variations and styles to choose from, each with their own positives and negatives. I’ve been through a couple, but the types of riding I do, is more suited to MTB pedals. After the long ride last summer I decided the effort needed for maintenance on the Crankbrother Eggbeater style pedal was way too intensive, and also I’d rounded an end cap bolt which resulted in having to drill the bolt and then reaching the thread in the pedal…. That was just me being lazy and careless though. Anyway, I decided enough was enough and invested in a set of Shimano XT and XTR pedals for my trainer and gravel bike, and off I headed merrily pedalling away for a couple of months until winter that was. And that’s where the real frustration came, riding in snowy and muddy conditions, the pedal would get filled with compacted snow or mud and I couldn’t clip in, that coupled with slippy pedal conditions feet coming off the pedals became a pain and pedal slips painful at points. So I sucked it up and decided to come back with my tail between my legs to Crankbrother eggbeaters, and that’s the point of this post really to talk you through servicing alternative parts, the pitfalls and the benefits of the pedals. The Benefits
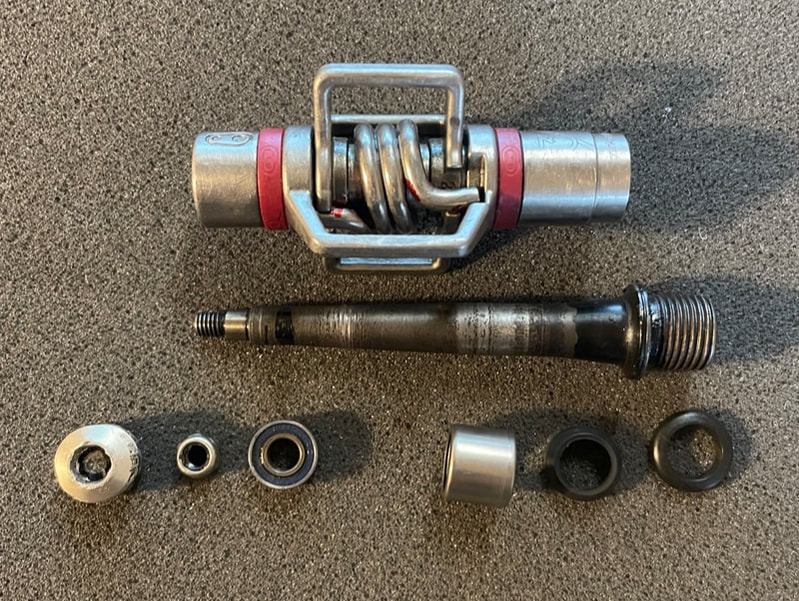 The Negatives
But that aside, servicing and even rebuilding the pedals is a 5 min job on each side (probably even less than that really) and arguably whatever the pedal is you should probably try and service after a spell of bad weather, but I know people with Shimano SPDs decades old that haven’t been serviced. Anyway the Eggebater Pedal rebuild. You can go easy and just buy the £20 rebuild kit it contains bearing, bushing, seals and caps and the all-important 10.5mm rod for knocking out the crank sim bushing. Or you can do what I do and go cheap, and upgrade. I now buy in HK1012-2RS needle bearings (as found in the Eggbeater 11s) and outer side enduro bearings, therefore improving the overall quality of the pedal internals. the tables below give you a side by side comparison. teh cheaper rebuild kit comes with a glide bearing instead of a needle bearing. If you think the seals have had it, it's worth going for the Crankbrother rebuild kit, but if you think you'll just need one or two new bearings it's pretty cheap to get them individually. The items listed in red under "upgrade kit" I've not had to touch as they're either not used, or i've not had to change since owning the pedals
I’ve linked at the bottom of the blog the Crankbrothers instructions page on dropbox, they have a nice step by step guide, but to sum up in a couple of paragraphs So what tools do you need?
That's it, for the basic service, remove the end cap and the internal bolt and everything slides off, taking note of the orientation of the seals (there is an inner double seal and then outside of that a single seal. clean it, inspect the bushing and outer bearing for wear and damage, smother it in grease and then slide back together again It’s that simple. If you want to go one step further you can replace the bushing, either like for like or with a needle bearing, this is where it gets ever so slightly complicated as the tolerance is very narrow. You find a tool that is exactly 10.5mm wide and gently tap through the pedal outside in to then knock the bushing out. It is very tight and it might feel like it’ll never come out again but a few taps and the rod and bushing will come out. Reassembly is the reverse, grease the new bearing and bushing then with a 10mm socket gently tap the new bearing into place, if you have a bearing press you could use this but you don’t need to. Gently (gently being the operative word as you’re dealing with bearing) tap the new bushing in until it won’t go anymore. Slide the two washers onto the axle, smother in grease, push the axle through seat the seals into the inside of the pedal, attach bearing to outside of the pedal, nut on top of that then reattach the end cap. Your pedals should now feel smooth and snug. I am a big fan of Eggbeaters they do work for me, they sadly aren’t fit and forget, and when I have forgotten I have had failures. If you are someone who shies away from servicing your own bike I’d say they’re probably not the best pedals for you, but if you like to strip your bike down every couple of months and give it some TLC you might also appreciate the mud clearing and performance of these pedals. Useful Links
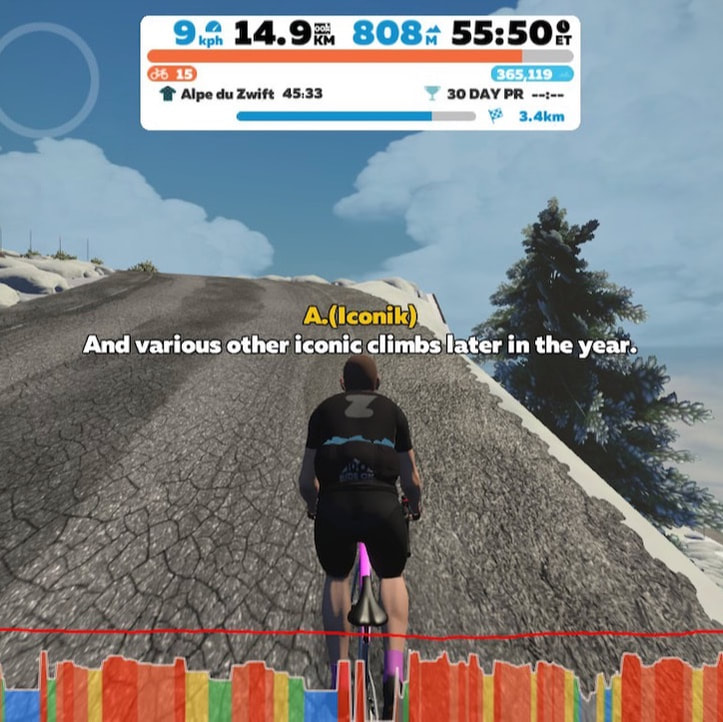
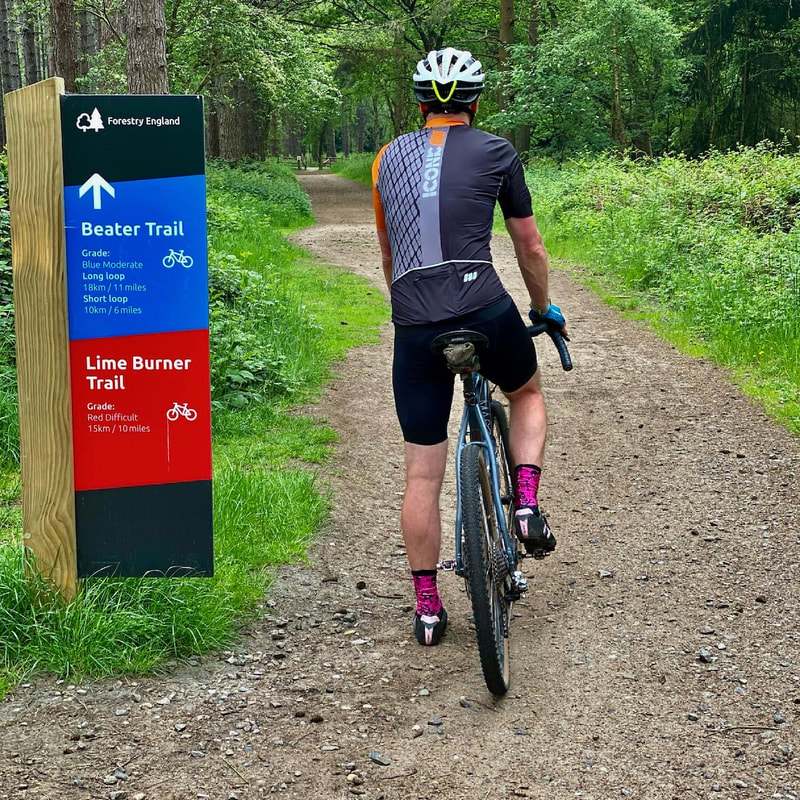
Crankbrothers - Pedal Refresh Kit Eggbeater 3 - Exploded View All Crankbrothers Technical Documents for pedals Bearing dimensions Outer bearing (furthest away from the crank arm - 6mm x 13mm x 5mm 2 Rubber seals (2RS) Inner bearing (closest to the crank arm) - 10mm x 14mm x 12mm* I purchase my bearings from Budgetbearings.co.uk * This is slightly longer than the glide bearing but are the dimensions of the Eggbeater 11 pedals and I've run for a long time. Back in December(ish), I stumbled across an Instagram post by @iconik_apparel it was fairly innocuous they were talking about a competition #21in21iconik the competition was to ride 21 iconic climbs in 2021, I typically pass by the majority of Instagram competitions because I'm not a fan of the constant notifications I get when I'm tagged in to comps so don't like doing the same to others (unless it's a prize I think they might want) but anyway I've not got enough time to tag enough people into those posts to stand a chance of winning anyway, but I digress... I try not to shy away from climbing and the group of friends I ride with were already planning on riding the iconic climbs in Cheshire anyway so I thought I'd give it a shot. I didn't know much about Iconik Apparel at that point, I knew they hadn't launched any cycling kit yet, they had some t-shirts and caps and it wasn't until they arranged some Zwift climbs that I started taking an interest... what they had planned and what they were doing seemed different.
The founders of Iconik Apparel Andy and Mark have sustainability at the centre of what they do, you can read more about their story on their website here, and I won't go into too much detail but in a nutshell, they wanted to create a brand that not only performed alongside the best kit out there but also considered the next generation, the environment, health and they aim to positively contribute to society and the environment through what they do. From the off, they have committed to donating a portion of their sales to World Bicycle Relief and The National Forest. to me at least, demonstrates they're committed to it, their core ethos, but also carefully sourcing materials to make jerseys and bibs using 100% recycled materials manufactured by ethical companies. Whilst all that is great, when it comes to cycling kit if you're planning on spending all day in the saddle, or even just an hour or two, you don't want to be feeling it for the rest of the day, after all, I could if I wanted to, donate some cash to those charities and then buy a pair of shorts and a jersey.  Fortunately, Andy and Mark have managed to create something pretty exceptional for the price point, I now own 3 items of Iconik Apparel cycle kit (which I've bought using the discount provided on their mailing sign up) I started with the Summit Jersey and then without seeing any other reviews or indeed anyone else other than Andy and Mark wearing them, took the plunge and bought a pair of the Altitude Bibs and the Switchback Jersey (because the first one I had was comfortable and I liked the design) and I've not been disappointed. the Jerseys fit well are comfortable and wick well in toasty weather, can't fault them at all, pockets are spacious the zip pocket takes my iPhone 12 and the other three pockets are amply sized for tubes wallet etc, in all honesty, I don't think I've ever pulled on an uncomfortable jersey, I very much like the style and fit of the tops and look forward to seeing what new designs they come up with in the future, but the shorts.... having been wedded to the same brand of shorts for several years now, the Altitude Bibs genuinely surprised me. Now for clarity, this isn't my review after 2 hours in the saddle, these are my thoughts after riding the Tan Hill 200. A 200km (125mile) Audax across Lancashire and Yorkshire taking in 4,000m (13,000ft) of climbing up some pretty steep gradients with temps hitting 18c so not the usually chilly conditions.
They're great, starting at the end first I wore these shorts from setting off at 6:30 in the morning to getting home around 20:30 (there was nowhere to change so that includes car journey as well) but I didn't feel that moment of relief that I have with other shorts when I take them off, they're compressing but not restrictive, at no point during the ride do I recall have to adjust myself or reposition to get blood flow back to my extremities, the pad is long enough at the front to support the crotch and provides just enough movement around the seat bones to subtly move your contact point. Straps wise they're very comfortable wide and supportive but with enough stretch to make comfort breaks, comfortable without feeling like you're going to either tear the seams or slice something off (or maybe that is just me). I really can't fault these bibs, at £90 less any discount you might find, they are all around the most comfortable bibs I own, I'm a big fan of the functionality of cargo cycling shorts (great for commuting with work passes and having easy access to phones etc) so I'm not quite ready to swap my entire wardrobe to Iconik Apparell yet, but this certainly won't be the last pair I buy. My understanding is that ladies kit is due to drop soon and the images I've seen on Insta so far look good. Go give them a follow and check out their website www.iconikapparel.cc (the kit visualiser is pretty neat), their story is interesting, the intent is exciting and the kit is fantastic, Go buy some.
As you’ll all know by now, I’m a bit of a Lusso fan boy, I’m lucky enough to be an ambassador but I still have to buy my kit and other than a bit of discount I don't get any kickbacks for getting your guys to buy their stuff, I recommend and wear their kit because it's good quality and it's good value and i'd recommend in the same way as I wear or recommend other brands when they do something better than Lusso. I was hoping to curb my bike kit purchases this year but recently turning 41 and having been given some Lusso vouchers for my birthday (in lieu of presents for my big 40th last year) I took a gamble and bought two of the new Lusso Rivington Jackets. A gamble because i'd not heard much about the jacket, and my riding doesn't shy away from riding in some pretty grim/tough UK conditions on and off road, so I want to be comfortable riding it has to do it's job well.
There are a couple of reasons why I went for the new jacket instead of the more expensive Aqua Pro Extreme, firstly I wanted something brighter (brighter than Orange???) and more jersey styled in my cycling wardrobe, and secondly I’m not letting COVID lockdowns get in the way of my out door riding so wanted something for the conditions, I wasn't able to ride as much as I wanted to last year for obvious reasons. So with the various teases @Lussobike had been posting I couldn’t wait for release and pestered them until.... ping it was put online, and I bought one in each colour, luckily I picked up the phone to Jake who guided me to the right size (you might need to size up as it’s an aero cut) But why am I bothering to write about this, well for me it’s the fact that Lusso are making progression in the right areas and I’ll explain why and talk you through my purchase, but spoiler alert, this is a super thin, extremely water resistant, warm jacket and at £140 I don’t think there is a jacket on the market that is better suited to cope with the unpredictable UK Spring/Autumn/Winter conditions. If that's enough for you head over to Lusso now pick one out in your size. TESTING So far since I received the jacket in Jan 2021 the weather has barely climbed above freezing, has often been raining and the one day it was sunny it didn’t get above 7c, and I’ve managed to ride all of those conditions, and the jacket has done nothing but surprise me in a positive way.  THE COLD Sunrise at the Cat and Fiddle it dipped to -5c off the bike taking photos for far longer than I should have done (check out the sunrise though) layering wise it's bib tights, and good base layer and the jersey. It traps the heat incredibly well, so at that temperature, and having climbed a few hundred meters I’d generated that heat. The descent down into the Goyt valley was very slow but I was able to move enough keep that heat in. At those temperatures I’d say it’s the kind of jacket that you have to work to keep warm at those temperatures but is more than comfortable to ride in. I even accidentally ended up rolling in the snow at one point and whereas usually you might stay damp for a bit and fighting off the cold (think wet glove) I was bone dry underneath and just kept going.  THE WARM(ISH) Sadly i've not been able to ride in anything warmer that 7c and have’t needed to open the vents that are built into each side, but I did do a pretty step hill climb in it that generated a bit of heat too (it peaked at a 37% gradient) if I had the stability to unzip the vents then I might well have done, but other than that one effort I didn’t really exert myself anywhere else so was one riding round the hills with everything zipped up. My experience of the vent though is they work really well, One of my early posts I used to ride in a Decathlon vented jacket when i first started riding again and when it got hot you could quickly shoot some cool air in the sides to drop your temp a bit and they work really well. The Aqua Repel V2 i find a bit restrictive in terms of breathability it can get damp inside and so I think the vent will really help from that perspective but only time will tell, just need the conditions to test it. 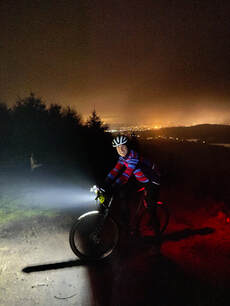 THE RAIN Finally the rain and I think this is wear I tested it to my extreme, a night ride in the rain/hail with 15mph headwind at 3c so a bit cold a bit wet and for a lot of people conditions that they wouldn't usually ride in.I must admin that I actually thought as I was riding up towards the Cat and Fiddle again that some water might have been getting into the jacket as I developed a bit of a cold spot just above my sternum, but as soon as I turned out of the headwind it warmed up again, and soon forgot about it, but this was purely down to the fact that for 30mins I had been riding into driving rain and it was just really cold, but this is where it think the jacket really excels, I wasn't wet and once I was out of the chilly head wind that spot warmed up again it was just cold for a short period of time because I was riding into really pretty horrible conditions, you've got to cut it some slack. Had it needed to dry out I could have been carrying that cold spot round for the rest of the ride. I’d hazard a guess that during the 1 1/2 hour ride it was only the last 5-10mins heading home that were dry, usually in that instance when I get home I’d been carefully peeling off damp clothes leaving them by the door. In the space of those 10 minutes though the top half had me had completely, and I mean completely, dried out, base layer was bone dry and other than taking off the muddy boots I wasn't faffing around in the hallway trying not to drag my damp self through the kitchen. And I feel this is where it really differs from most other cycling jackets, I’ve always felt that most jackets repel water to a point, then it absorbs in the first layer and kind of warms up like a wetsuit, but never seeps through into the inside, but when you stop moving the wet layer gets cold quickly and you need to get going again to avoid getting uncomfortable. With the Rivington jacket it just runs off, to quote from the website. They call this Direct Venting™ technology, and unlike other technologies, it doesn't need to get wet to work. It’s a 'dry system' that allows eVent fabrics to be fully waterproof and fully breathable. Direct Venting™ technology is engineered to keep you in the ‘dry zone’ – a steady state of temperature and humidity that reduces the wild swings our bodies go through to stay in balance during physical exertion. The dry system also means that when you stop the wind isn’t able to cool down a wet layer on the outside so you’re not having to (or at least I found) to worry so much about cooling down rapidly. As mentioned I do feel that this is a jacket that you perhaps have to make work for you, by that I mean you need to generate some heat to trap inside first, it’s not a fleece lined jacket that feels like you’re being hugged when you first put it on, but once you’ve spend 5 mins getting going it works really well, and recently I cycled a leisurely 80km over 5 hours in snowy conditions and was comfortable all round so I'm not talking flat out head down efforts to get warm. My jackets have been through the wash a couple of times and are still working as expected, sadly for the time being at least all my other Lusso Jackets have been benched down to just how well the Rivington Jacket works. I really hope Lusso continue to develop kit in this fabric, the price point and style in my opinion makes these impossible to beat in value. The fit is described as a close aero fit so it doesn't blow or rattle around when you're going at pace, it is on the snug side i'm 6ft and 82kg and take an XL but when you're on the bar tops and have the tail pulled down everything sits nicely, but it is worth taking a look at the sizing to make sure you get the right fit.
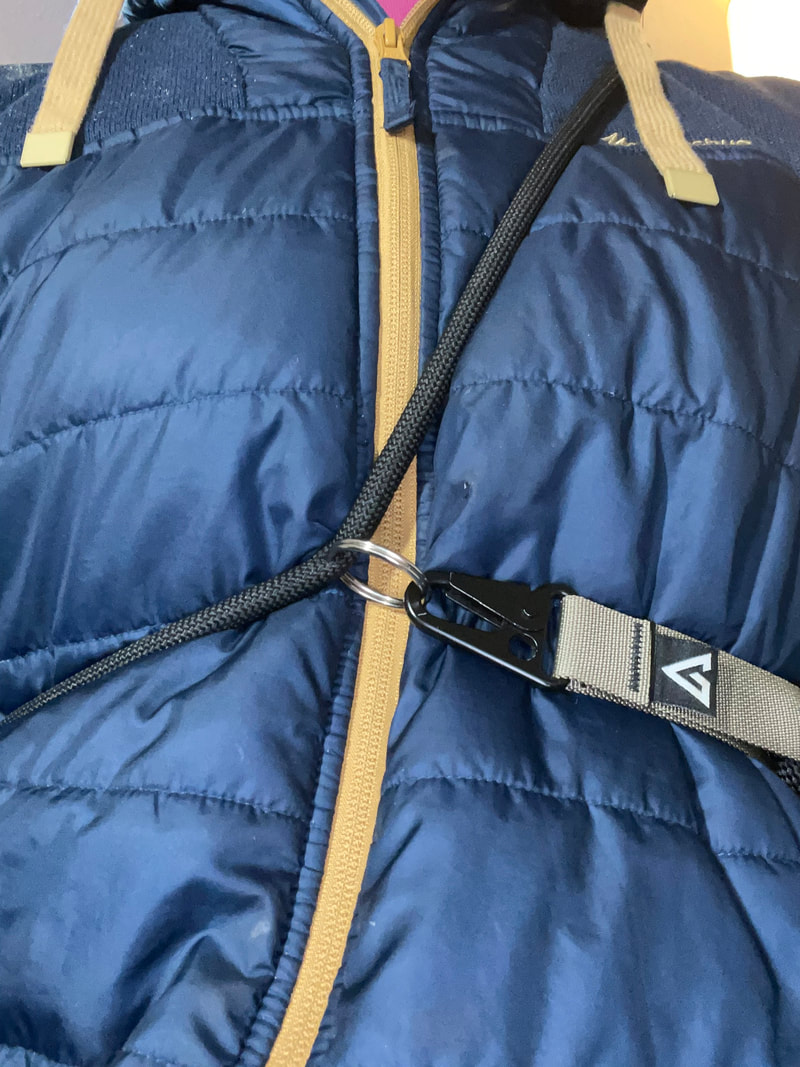
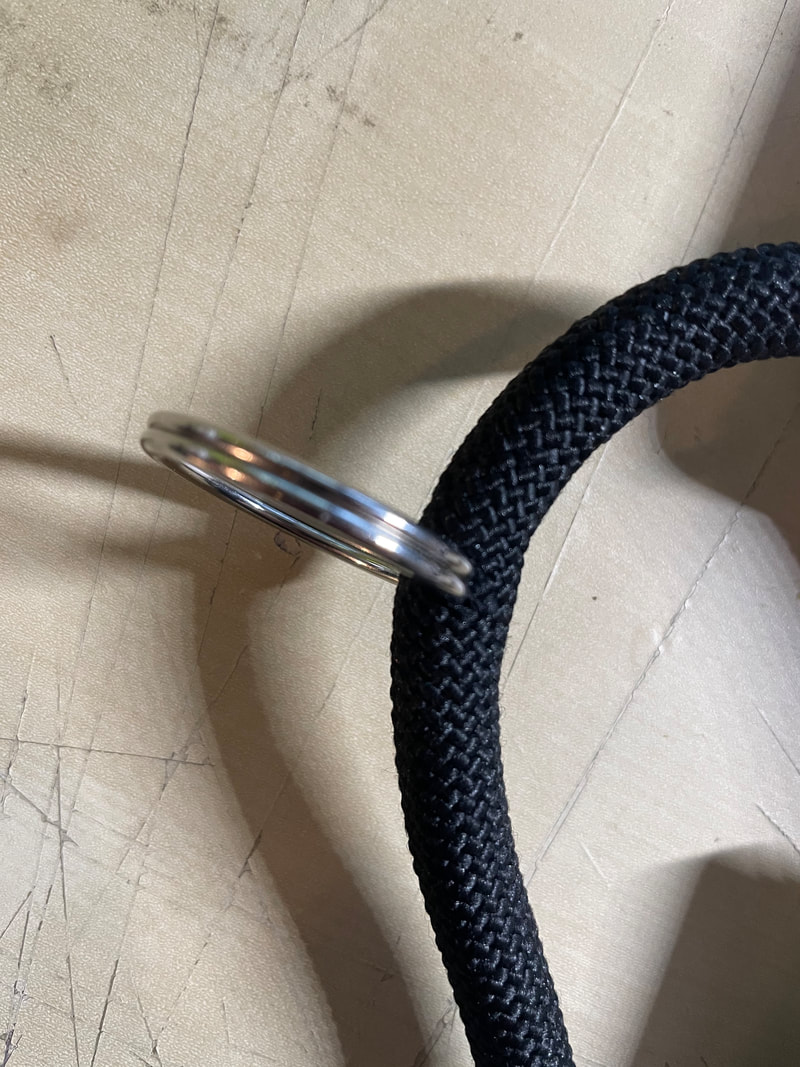
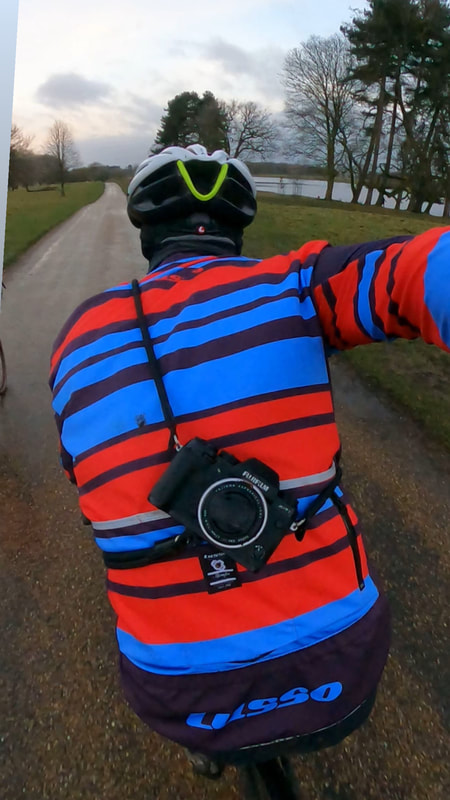
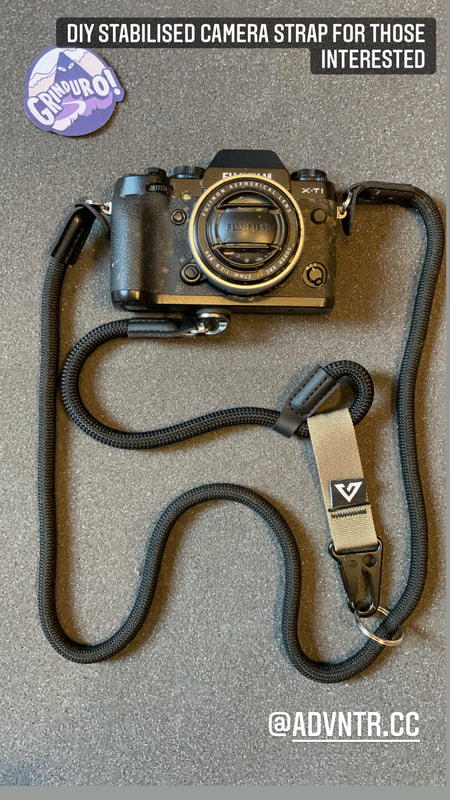
Absolutely there are jackets out there that are cheaper and will offer decent waterproofing but if you’re heading out autumn through the spring in the UK you could throw this on and not have to worry about packing a separate rain coat or Gillet and you could easily pay double for Rapha or Castelli and end up with a jacket that isn't a patch on this one. To say i'm impressed with this would be an understatement and I have no doubt the Rivington Jacket will be topping the reviews before you know it and I can’t wait to see what else Lusso make using this tech. Go and head over to the Lusso website to take a look, a perk of being an ambassador is that I get a discount code that I can share that’ll get you 20% off at the check out so if you like what you’ve read then head on over and use Mike20 at the checkout. 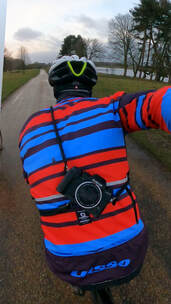 This should be a short and sweet one, switch out the bits you want based on budget, style choice etc. I'll research a few options and signpost or link to shops, or what to google. First up what are you making. If you cycle with a camera using a normal strap you'll find that it routes around your body, typically when you least expect it or what it to happen. This can be both annoying and potentially depending on the length of your camera strap cause your camera to whack into your handlebars. Basically all we're doing here is adding a 2nd strap between the base of the camera and the strap itself, so it stays pretty solid on your back.  It's made of 4/5 parts the parts are listed and costed at the end of the post. 1 - The main strap 100cm - this will typically connect to the two sides of the camera and go over your head and under one arm when you're cycling. Here I have used a camera rope strap that isn't adjustable, mainly for comfort. You will need to poke a small hole through it to attached the key ring loop, but there is no reason you couldn't use your existing camera strap. 2 - 1/4 inch screw connecting adapter for camera. This is the little D ring that will screw into the base of the camera, where you might usually screw in a tripod mount. Again if you have a tripod mount or Gobi you might find that the screw base is actually big enough to secure the stabilising strap to the camera, but i picked mine up shipped for £1.26 and it's a bit neater 3 - Stabilising strap - This connects the bottom of the camera to the centre of the main camera strap. I've chosen to go for a wrist strap as they're a little smaller, but there is no reason you couldn't buy two rope straps and have a bit more adjustability. 4 - Key ring loop - this is the little silver loop that, that attaches your key to your keying 5 - Quick release key ring - or a Carabiner basically something to connected the stabiliser strap to the main strap 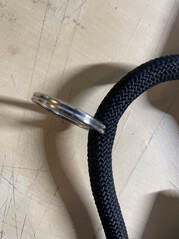 Assembly - this is really simple and there is only one place where it could go wrong and need a bit of brute force. 1 - Attach the strap to the camera 2 - Screw in the 1/4 screw into the bottom of the camera 3 - Attach stabilising strap to the bottom of the camera 4 - Clip the key ring to the wrist loop 5 - Put the camera strap on and find a comfortable place on your body, reach behind you and pull the stabilising strap up so it forms a cross over the other strap . 6 - Wiggle the two straps that shouldn't yet be connected to find a spot where the camera feels comfortable, you want some slack so when the camera is unclipped you can move it to the front of your body, but it need to not move around too much. you can take up slack in the wrist strap by making the wrist loop larger, but bear in mind you might need to put a stitch or two through this to make it permanent. 7 - Now the trickyish part - the key to this working is that you have a connection point on your chest that doesn't move around so taking note where the most comfortable place for the key ring to connect to the chest strap, carefully force the keyring loop through the rope. Effectively what you have then is a fixed point on your chest that can then be used to connect the stabiliser too one handed and carry on riding if you need to. The Downside of this design is that it isn't adjustable without come tweaking, but you could tie knows to shorten it pretty easily, but lengthening is probably a bit trickier, in fact if you're over 6ft or are pretty muscular you might want to consider not using a wrist strap as a stabiliser or used longer keyring to connect it. Parts list
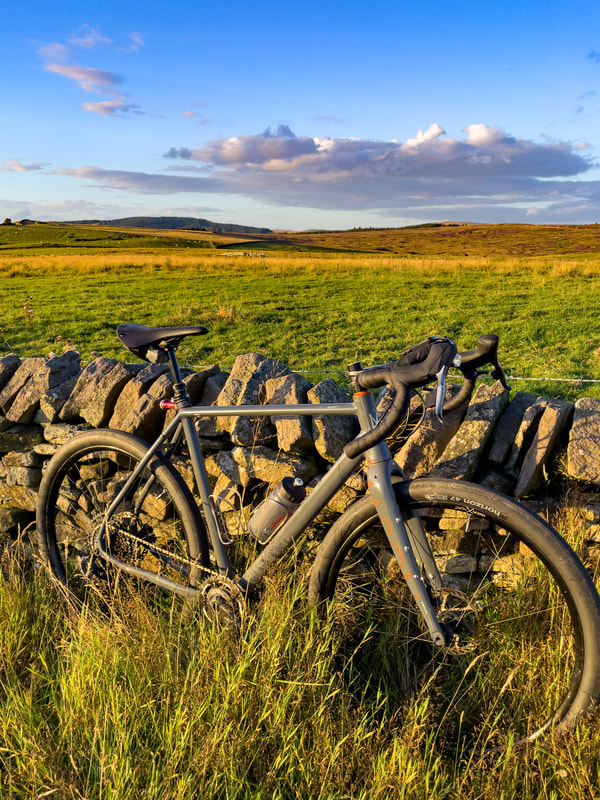
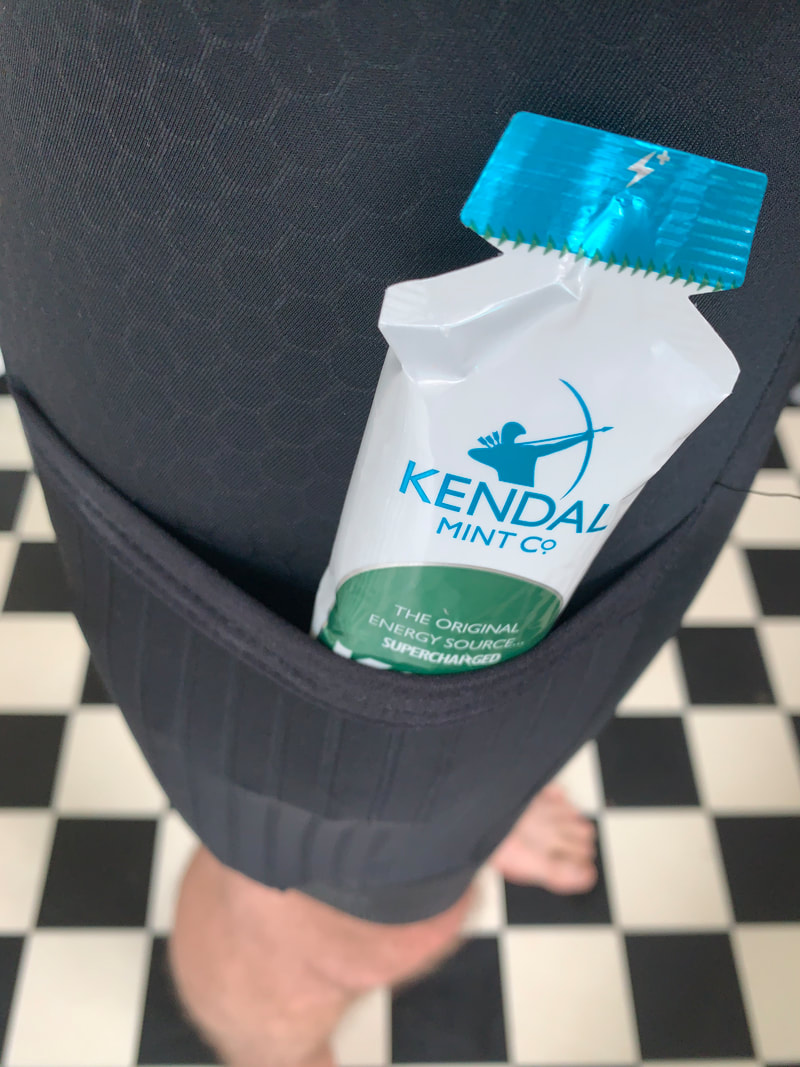
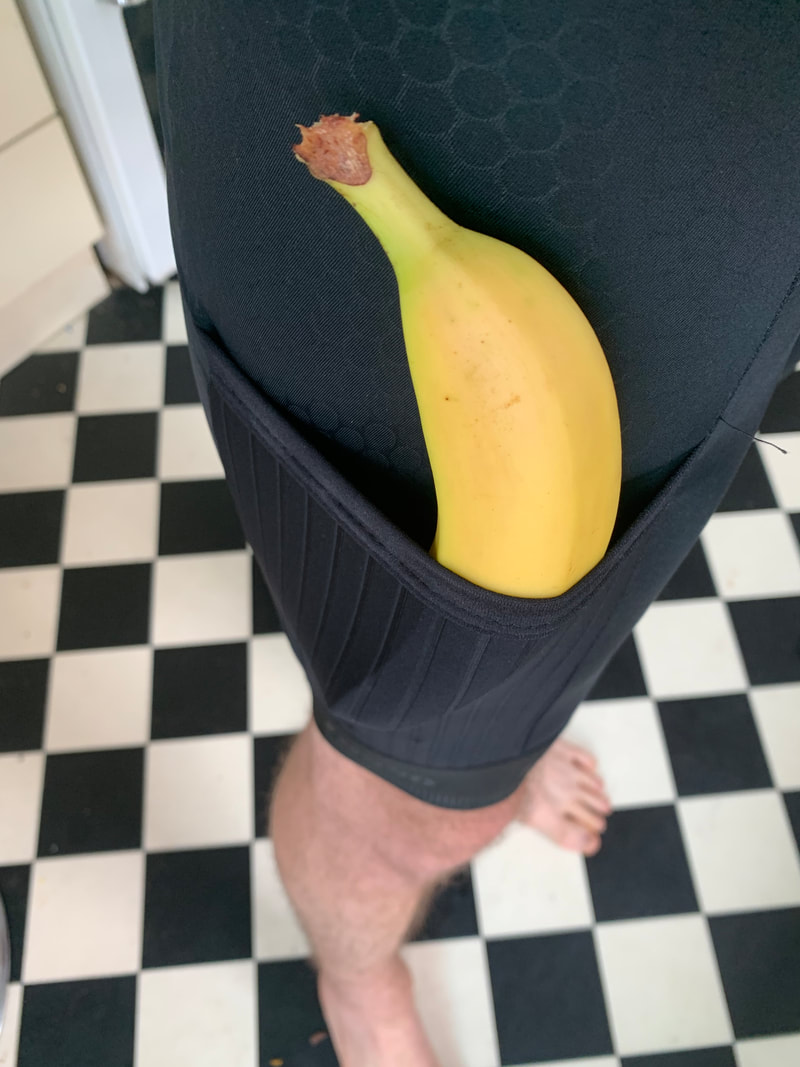
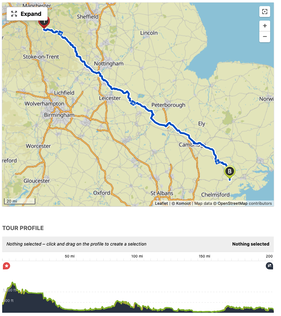 So 2020 has been a pretty wash out it started out positively, I turned 40 in January, we had tickets to go the Tokyo Olympic Games, and I’d planned a series of long rides. I’d though 2019 had been a bit of a rough year, but 2020 trumped that a bit. So along comes March and everything starts to fall apart in the UK and the rest of the world. The long rides I’d been planning on doing were for Papyrus UK a charity set up to prevent suicide in young adults, a charity close to me heart having lost my sister Becky to suicide nearly 30 years a go. The crux of the event was my brother and I riding from Macclesfield Cheshire to Coggeshall Essex, which was around 200 miles, and quite frankly I didn’t really know what to plan for? So what does it take to ride 200 miles, well, surprising not as much as you’d think, or rather not as much as I packed. In hindsight I think I had packed for several weeks away food wise (well maybe 2-3 days). Route Planning There are loads of ways to route plan these days, ridewithgps, Strava Routes, Maps, Google it something will come up, but I’m a big fan of komoot.com it has lots of maps for running, walking cycling etc. and gives you the option to select the type of riding you do, i.e. Road, touring, MTB… and that was guide of choice, that said I did check it out against Strava heat maps as I figured that I actually want to take in roads that have a high volume of cyclists as to my mind that makes them the safest roads. As it happens Komoot did a really good job of mapping that out and the only tweak I made to the ride was choosing to go south of Nottingham rather than up and over. I think with any route planner riding on roads you don’t know you are heading into the unknown, but my experience in using them has been really positive, 3 years ago I used Google Maps to plot and navigate a 500 mile ride Manchester, through Wales and into Essex, it worked really well. Where Komoot comes on top for me, is that fact it can be used offline with your phone, or if you have a Garmin or Wahoo etc. you can upload the route to that and have turn by turn directions. Im not big fan of having my phone out front on my bike so a little GPS unit works a treat for me. 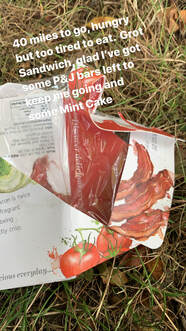 Snack Planning Man I cocked up on this, not in taking the wrong things (well kind of) but I just way over packed. Any long distance ride you want to be grazing the entire way to keep your calorie intake on a par with your burning. I think I’d packed enough food to sustain me for days, Bananas, gels, Energy bars, sandwiches, nuts, pretzles… and the energy gels and snack bars whilst delicious became a bit too sweet towards the end of the day, as did the my Kendal Mint Cake energy drink, I was actually craving water towards the end of the day. So what about the savouries, well don’t pack salted Pretzels if the weather is going to be hot, I think I ran pretty close to being dehydrated at one point, not because I wasn’t drinking enough, but because of the excessive salt. But in the grand scheme of things, given we were in the midst of a Pandemic, I think over packing on the basis that some of the shops might not be open wasn’t a bad thing, but unpacking at the end of the ride, I had handful of energy bars and gels left, but no savoury snacks, and arguably I wasn’t left feeling hungry. When my stomach growled on the ride I had a bite of something to eat. SO to say I cocked up, was probably a bit harsh, I had over prepared probably taking twice as much energy food as I needed which meant maybe half a kilo more food than I needed to carry, but if there had been a problem, maybe I would have been grateful for the extra snacks? 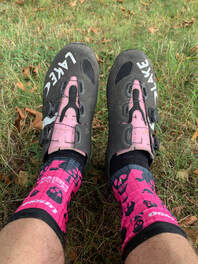 Love these socks Love these socks Clothing This is wear things get really simple, you need to be comfortable, it’s as simple as that, the shorts you always reach for when your getting ready to go out cycling, your favourite jersey and what ever else, socks and shoes. Simple right. My choice for doing 200 miles were the Lusso Adventure Bibshorts, a) because the pad is so comfortable I’ve ridden multiple 100+ rides in them and b) the extra pockets are really handy and mean you don’t have to reach around to your back pockets. Matt on the other hand opted for the Lusso DRS Bibs, which have really excellent compression that somehow tricks your legs into thinking you've not ridden as far as you have!! Jersey wise, I love my Lusso Merino Jersey, is light it’s soft and it’s comfortable and being Merino it smells better after 14 hours in the saddle Gloves wise… well when was the last time you bought new gloves? I wear Lusso gloves as I find them comfy, but given that gloves are a main contact point, they get used to wipe your nose, brow etc. etc. etc, it’s time for some new gloves, but at least go out for a ride before wearing them on your long ride as they have to be comfy. Socks and shoes, well wear what you have and what is comfortable, so longs your current shoes don’t give you hot spots or numb spots you’ll be good. The weather forecast said it was going to be hot all day with not a chance of rain, I took a Gillet and arm warmers just in case but opted not to wear a base layer as really didn’t want to risk over heating, ultimately it was the right choice as I wasn’t cold at any point, and given it was a 4am start up into the Peak District it could have got pretty cold. The Bike I had wanted to do this ride on my shiny new Mason Bokeh… but the frame still hasn’t arrived yet (at time of writing) But that said my Vitus Energie is more than capable, 1x with a 42T upfront and 11-42 at the back. That coupled with 650b wheels and 47c WTB Horizon tyres, I was able to tackle every surface and been very comfortable with it. But in short looking at what your journey has in store for you is the only way to know if you’re bike is going to be set up for it. Whilst doable, cycling the Tissington Trail isn’t going to be overly comfortable on 23c tyres but it would be doable, and equally trying to ride 200 miles on a full susser is going to be doable but that will most likely be a lot of weight you’re pulling along. I also opted for the Ridefarr Aero Gravel Bars, which for endurance riding were a god send as you've got a few extra positons, i've written about these before, and can highly recommend them, even just for day to day riding. Komoot can really help with this as it gives you an overview of elevation changes as well as mile by mile surface types careful route planning and understanding what you’re riding is a must. That extra bit of preperation can really help make sure youknow what to expect and when before you set off. Overall
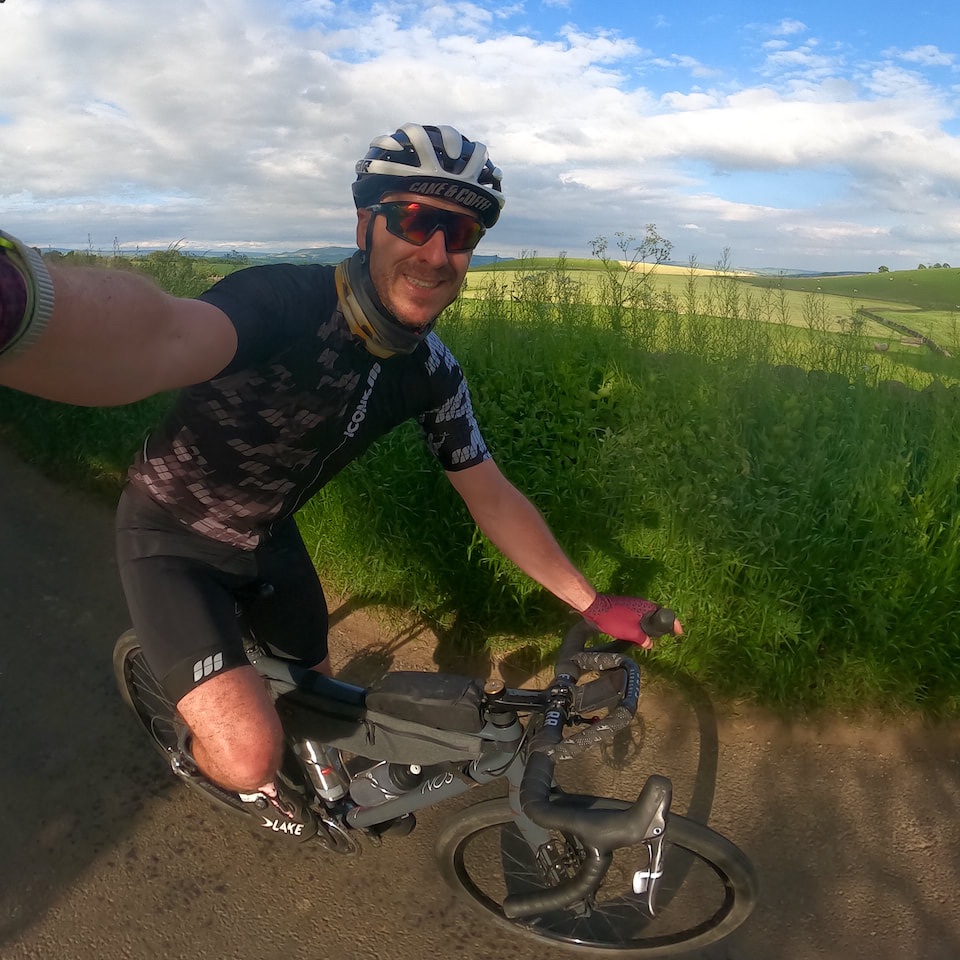
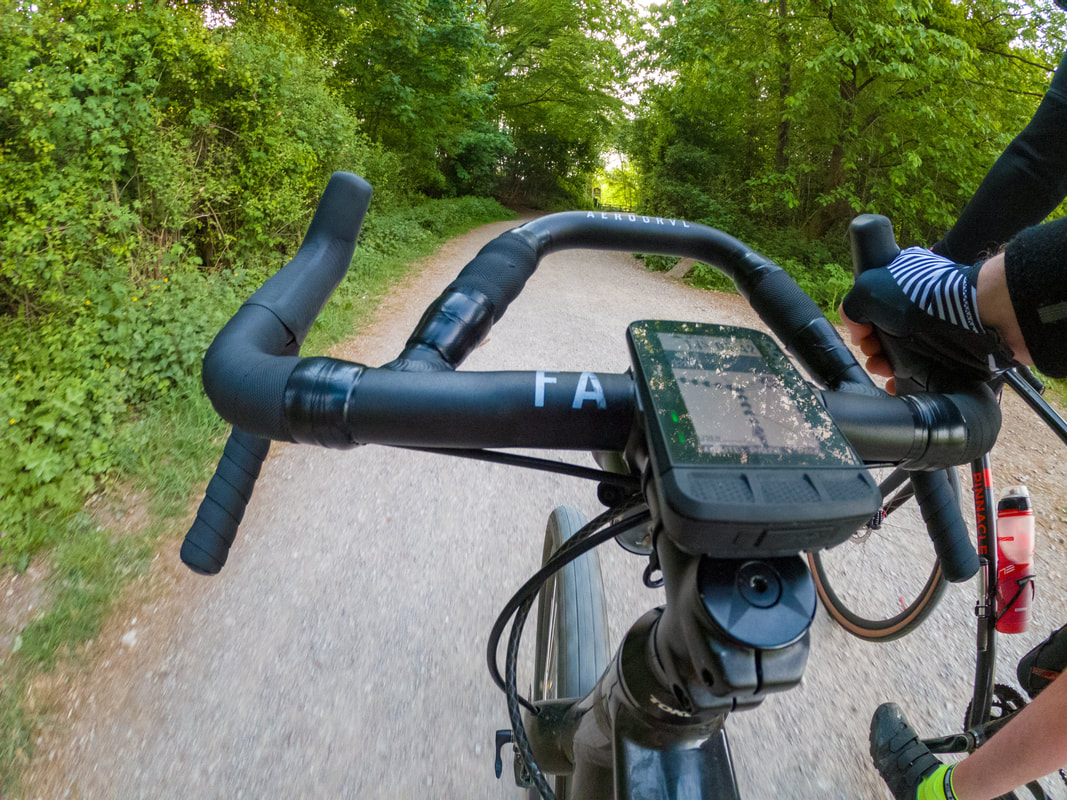
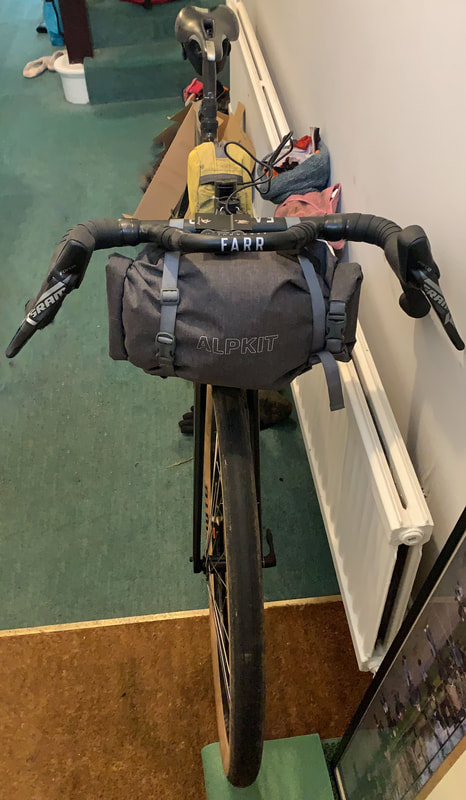
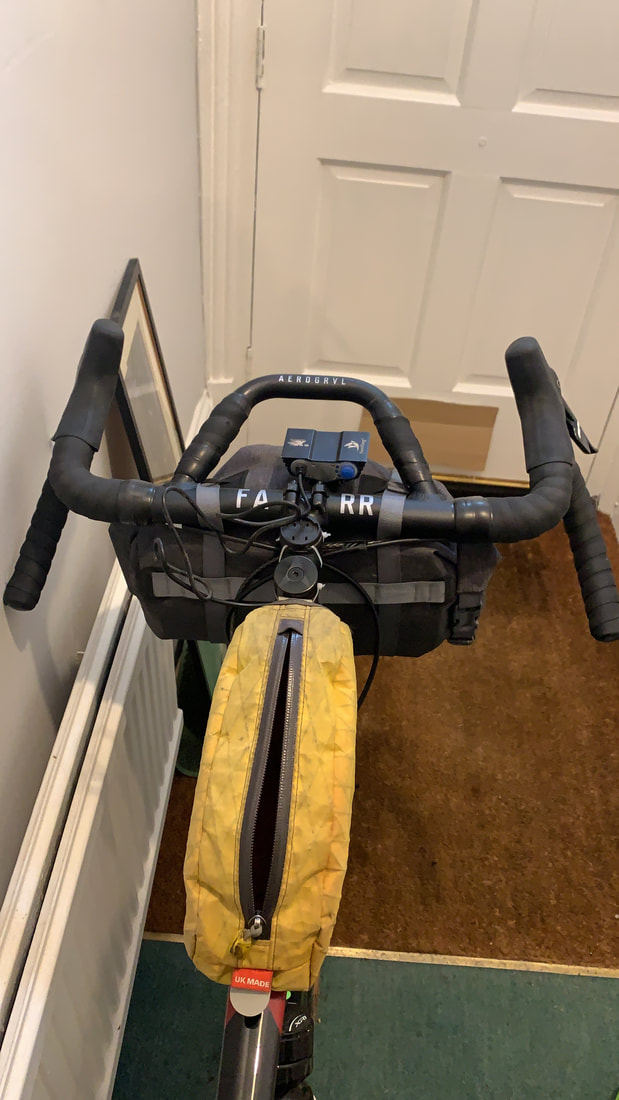
Riding any 200 in a day is going to be tough, but using the right tools for the job does make life a lot easier. Having ridden 100 miles + previously I knew that physically I’d be able to make the distance, but mental fatigue and doubt did plagued my mind a bit. Taking the time to plan a route and knowing what is coming up ahead is really important, there were parts of the ride around Leicester that were really hilly and completely took us by surprise I’d honestly thought riding out of Macclesfield would be the hardest part, but equally riding through Cambridge whilst we new it would be flat was really surprising as they had 20 miles of perfect cycle path, when I’d thought we’d be stopping every few 100 metres at junctions. Don’t think you need the fanciest or most up to date kit for rides like this, if you have kit that works and is comfortable use it, changing saddles shoes cleat portions etc, just before a long ride is likely going to make you hurt, as would an untested pair of shorts with a slightly different pad shape, back all the spares that you would normally take in your tool kit, unsupported rides with a failure is going to be pretty catastrophic, but a proper pump some tube patches (even if you’re tubeless) will be essential, although fortunately we had no mechanicals but I had serviced my bike fully before we set off so I knew everything was in pretty good shape. And for the cliche, just enjoy it, stop, take photos, enjoy the scenery. Unless you’ve got a time limit getting there quicker isn’t going to make it any less of an achievement, it’s 200 miles!! 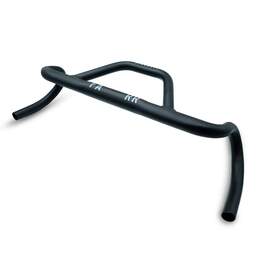 Since starting riding again (several years ago), anything longer than about 15 miles, especially when commuting with work laden back pack, was aggravating an old shoulder injury often leading to pins and needles and culminating in me waving my arm by my side every few miles to try to ease the pain. A bike fit initially helped, or certainly allowed me to ride longer and further without aggravating it, but, as anyone who has dislocated a shoulder(s) will probably know too much pressure in one place makes it hurt. I can't remember when it was but I happened to stumble across Farr or Ridefarr a company who specialise in making endurance inspired bike solutions aimed at making riding more enjoyable, easier and faster. At the time being and being pre lockdown I had several 200 mile in a day rides planned for charity and was considering getting a set of tri bars just to allow me to adjust my body position a bit more. Having seen a number of ultra distance riders opting for this configuration and personally finding myself stretching out into that position mid commute with my forearms resting on the bars if my shoulder was starting to hurt it made sense. During my trip bar search I stumbled across the Farr AeroGravel bar, I think on Instagram, a flared drop bar with an intergrate aero traingle welded out front, it looked really interesting and certainly seemed to tick a box. Typically unless you're planning on weight saving new bars wouldn't have been something that I would ever have considered, but the Aero Gravel bar seemed to be a great solution to the problem I had in terms of sore shoulders, but actually I think the benefits are more than that, i've found the positioning more ergonomic than most other bars with the wide flare. Yes i still use the hoods and the drops, but when im climbing or just relaxing on the bike i'm using the aero section. I'd probably liken it to when you're resting you arms on the table in front of you, you naturally (or at least i do) position your hands closer together, and for that reason it's my default position. 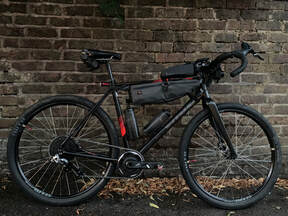 Arguably comfort is probably the first reason to consider these bars, yes you can use them to go aero and you can get a really nice compact tuck using them, but I don't necessarily think Gravel riding is all about going fast, certainly not from my perspective anyway. When I was first getting used to the bars I found grinding out long uphills much easier out front than on the hoods. That said if you do want to go fast these bars won't hold you back, more positions means more opportunity to get comfy and if you can get comfy you can go further faster and for longer. Then there is the added bonus of all the space for mounting your stuff, from bags, to lights, GPS etc there is plenty of space... But, I did find that when I moved from an Element Bolt to and Element Roam I had to move to a stem mount rather than out front as the top LEDs on the Roam were hidden from view when using an out front mount. that said, I'm used to it now, and mounted on the stem works well, i've opted for a K-Edge adjustable stem mount (UPDATE: Farr have just released a new mount that will allow the GPS to me mounted out out front so go take a look) Overall I'm really happy with these bars I've ridden a few thousand miles on them including both an indoor and outdoor 320KM+ single day rides, which I think i would have struggled with previously. They have improved my ride comfort quite significantly, they look good and they function better than I anticipated. Actually on the back of my experience with the bars, I've also bought the aero top tube bag and a frame bag too, which were well and truly stuffed full for my 200 miler last month, and will now being utilised to carry my lunch to work. As of writing I'm in the process of building up a new frame and the Aero Gravel bar will definately be moving over onto that, and most likely when i convert my old bike into my winter commuter I'll be adding another set of these too, although I do quite like the look of the new bolt on (but i'd also need a new set of bars anyway) I paid full price for these bars, but their worth every penny!! Bars and bags are available internationally via Ridefarr.com or if you're in the UK ridefarr.co.uk
First up, I'm a big fan of Lusso kit, that's pretty evident if you follow me on instagram, but that all stems from pretty much stumbling across Lusso back in 2018 when I decided to commute through the winter, and I laboured for hours over what kit would see me through the winter months. Lusso ticked all my boxes. A few purchases later and an application dropped in, I became a Lusso Brand Ambassador in February 2019.
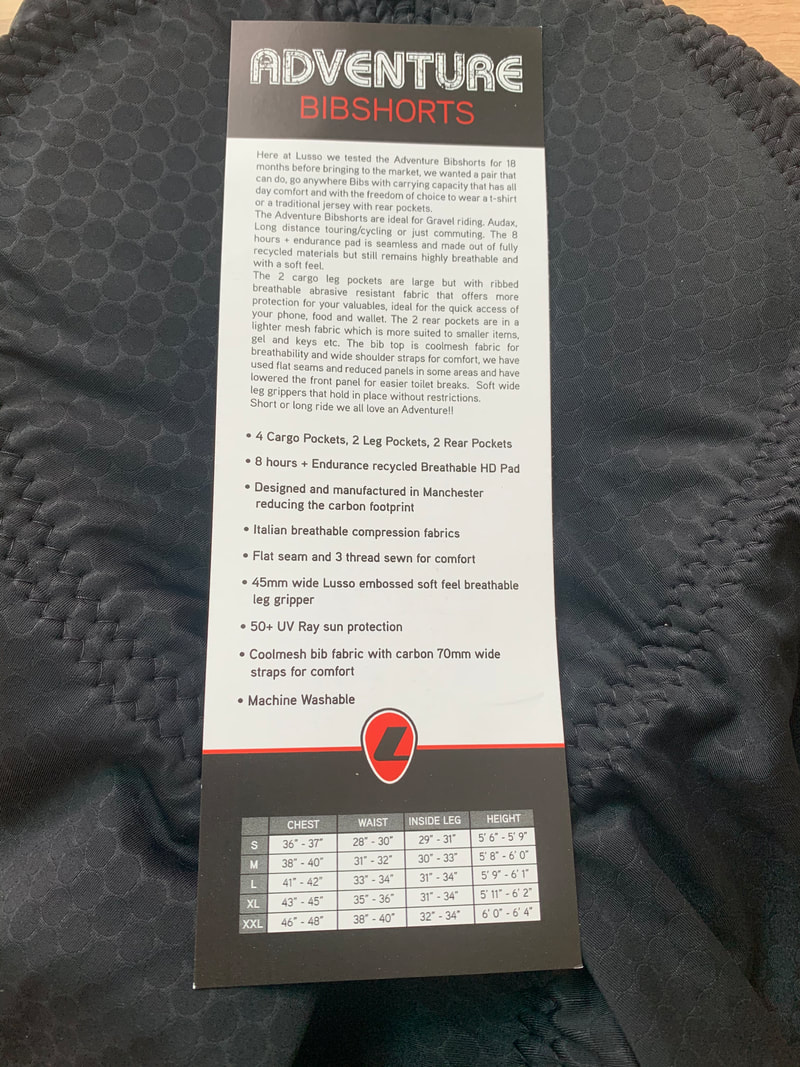
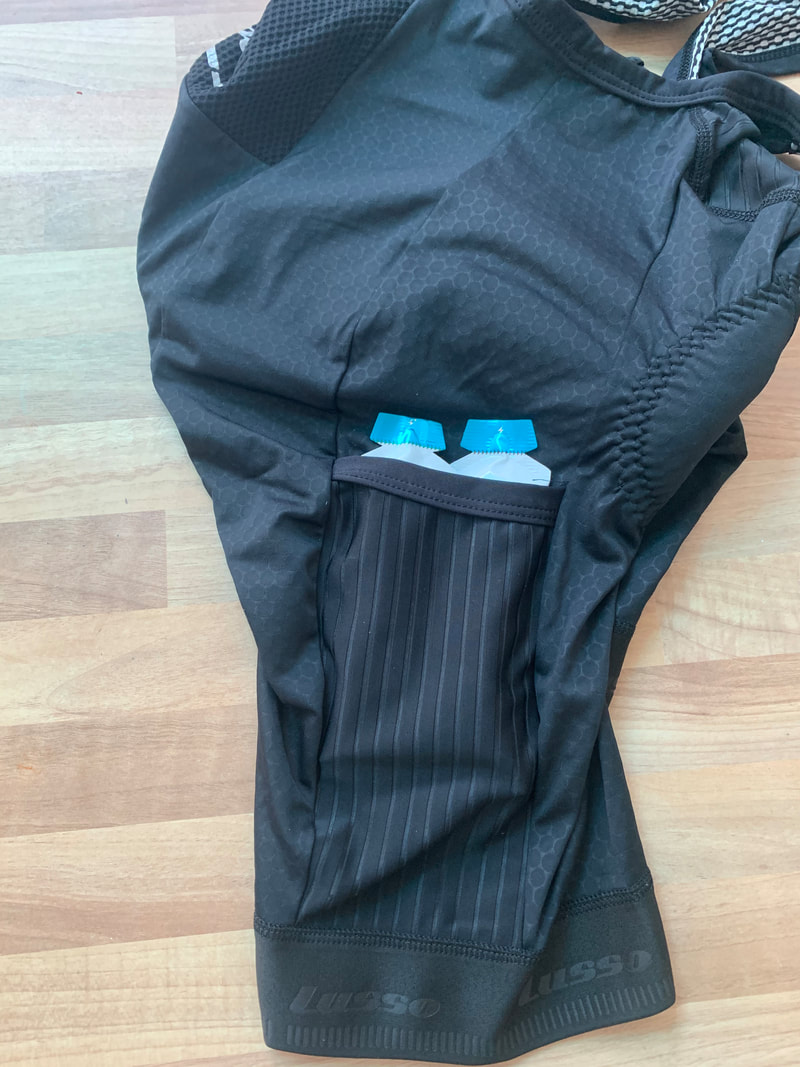
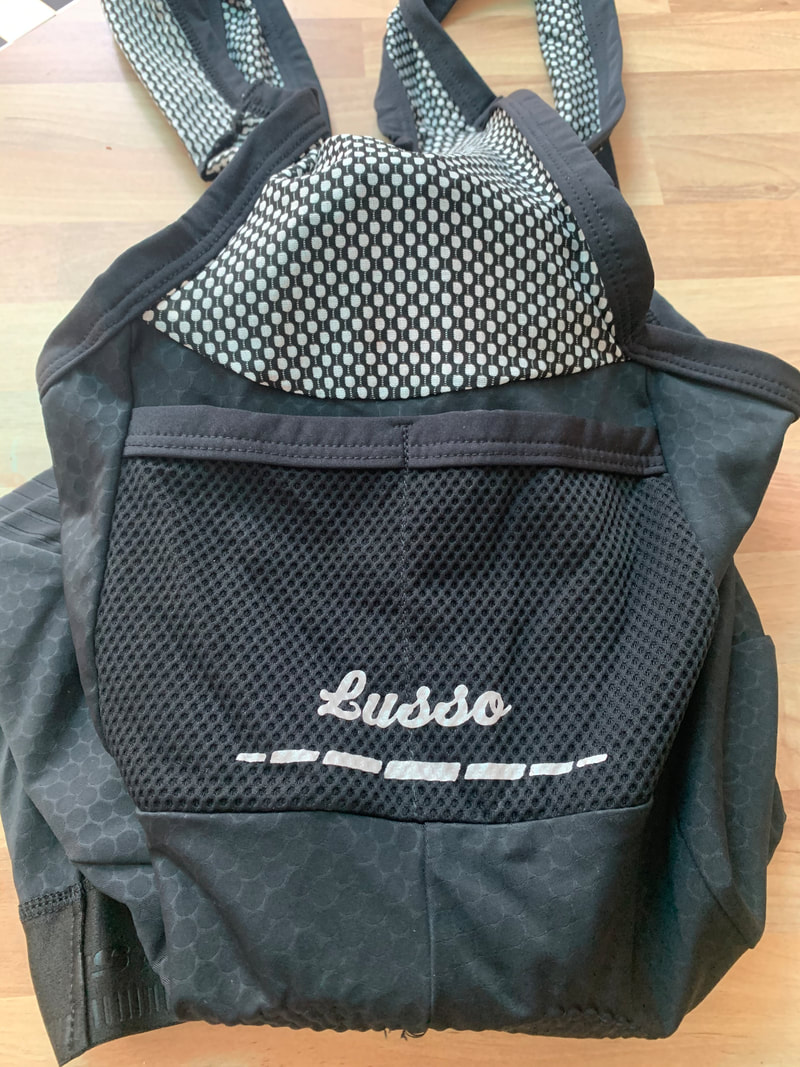
That does bring some perks and I get my Lusso kit at a discount (and if you use Mike15 at the checkout you'll get 15% off non sale items). That said I bought these shorts not because I needed some new ones, but because I've wanted some cargo style shorts for a while. I'd looked at Rapha, Sportful, and a number of others that have released this style shorts, and also considered my experience of the other bits of kit I had bought from them. I struggled to match their price to my previous experience of quality, and held off purchasing. Needless to say I was pretty pleased when Lusso announced these shorts and pre-ordered them straight away. What are Adventure Bibshorts? Quite simply bibshorts for all day riding. They provide a few extra pockets which are easier to reach, two on the thighs "cargo" style and two on the back. The benefit of shorts like these are that you can wear them under any t-shirt/jumper/jacket and still have access to a couple of pockets on your back. Why would you need pockets on your shorts? Well no, no you don't but there is a good reason to have pockets on you legs. They are incredibly accessible, I had no problems stashing two gels and a GoPro with mini tripod in one of the leg pockets. But the real benefit for me at least was the back pockets, they felt lower down than my jersey pockets. For anyone who has suffered a shoulder injury in the past, and lets face it most cyclists have come off once or twice, having a pocket slightly lower down your back was so much easier to access. I found (once i'd got used to their placement) they were far more comfortable to reach and retrieving things from pockets was faster and just felt less awkward. Doesn't it feel weird riding with something on your legs This was the bit that really surprised me, my first ride in them was on a very wet and muddy gravel ride. 
Plenty of rough terrain, out of the saddle climbing and rolling downhills, and I can honestly say say I didn't notice anything on my legs, or back, even when I'd stuffed the GoPro in on top of my snacks.
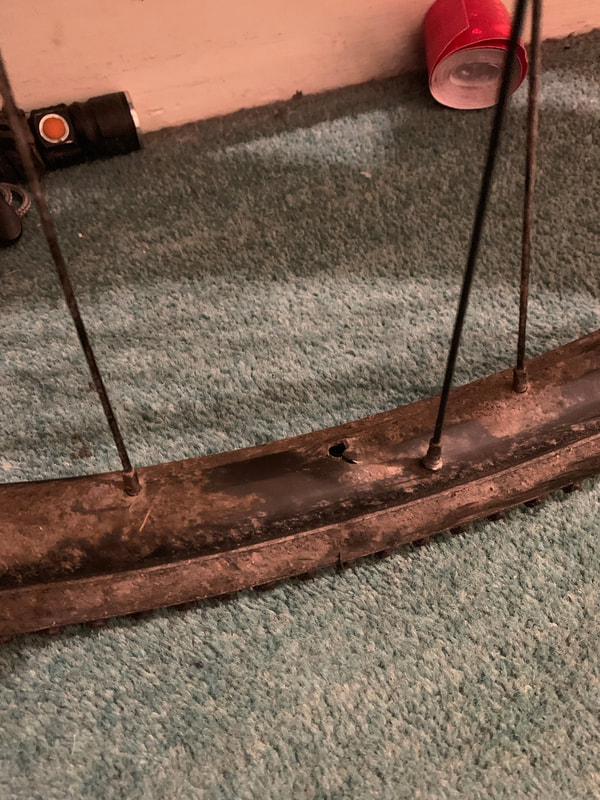
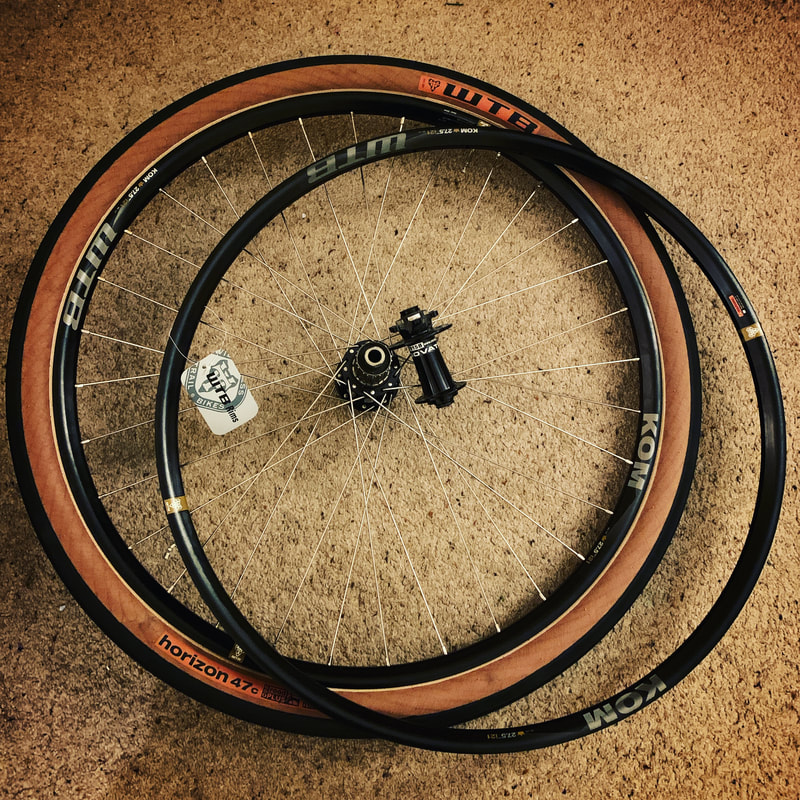
I think this is impart because the outer pocket fabric is a very compliant elastic material, with much more give than the main Bibshorts material. So rather than the fabric touching your leg deforming, the pocket deforms first. But at no point during my ride did I have to stop in frustration to adjust the contents of my pockets. That said I imagine it would be a different story if I used my leg pockets to store keys or tools. Think leg pockets for things that you'll whip out and need quickly. And back pockets for the moments you have to stop, keys/tools etc. Anything pointy is probably going to rub and cut the fabric as well as stick into you. Think it’s probably just common sense not to do that. The Ride? It genuinely was really good, and I think from now on until something else comes up I'll be purchasing these alongside my go to DRS shorts. I could easily sit in the saddle for 100 miles plus in these, and probably will on my charity ride in August, I just need to weigh up whether the benefit of more on body storage has more pros than the benefits of the compression over 200 miles I’d get from the DRS shorts?. I can whole heartedly recommend these Adventure shorts they really are superb, both in terms of fit, craftsmanship and styling. Value for money at the time of writing they are £125.00 but if you use Mike15 at the check out you can get 15% off. This sits them in the middle of the market for similar products. Personally I feel the benefits of knowing that the items are manufactured locally to me (Manchester, UK), and having dealt with their customer services both for crash replacement as well as general advice, puts Lusso above competition. Final Thoughts Adventure shorts really do serve a purpose and not just for adventure rides. Unless you're on the look out for KOM's and want to avoid marginal losses of aero caused by turbulence generated by a pocket on your thigh, these make perfect sense. They afford you to be able to use you back pockets (jersey pockets) for your tools and a few spares things you don't want to access regularly on your ride. Your leg pockets you can stash your phone, camera, snacks and items that you might want to pull out when you're still moving. I can't count the number of times, I've pulled my phone out of my back pocket and nearly dropped it, or had to carefully fumble in my pocket to pull out gel out, whilst making sure my keys don't get pulled out too. The thigh pockets give you a reassurance, you can fit your whole hand in and out easily if you can't feel the pocket on the back of your hand, you've not put what ever it is you're putting in you pocket, in you pocket. From my perspective I'll be slowly replacing my bib shorts with this style of short, I'd love to see some new designs coming out, specifically a DRS/Adventure cross as well as some more casual jerseys that match the adventure style. Head over to Lusso.bike to see what else they have.  Well that’s a bit of an understatement… 2019 was a bit of a challenging year for me, the Charity I worked for fell into Administration, which meant very quickly having to find a new job, found a new job, which I very quickly realised it wasn’t for me, so a quick job search and somehow I’ve managed to land a job that, ticks all the boxes for me. Throughout that period I’ve tried to keep up my commuting but as you can imagine, new jobs mean less time, and less time means no blog posts. But really a lot has gone on it that time. The accident back in Feb last year took it out of me a bit, a lot of downtime as the accident led to a snapped frame, which meant needing a new bike and I’m still waiting on the outcome of insurance, 12 months later… I mean come on that’s nuts but hopefully they’ll be a resolution soon. One thing I would say, is get insurance, whatever it is something or someone that will fight your corner if you have an accident caused by impatient driver stupidity. But I’m back riding again, a new frame and fork and upgraded groups and a few new toys to play with. So all being well I’ll be pinging out some blog updates, weekly or maybe monthly depending on workload. If there’s anything specific you want to hear about let me know in the comments below and if I can I’ll try and help out. 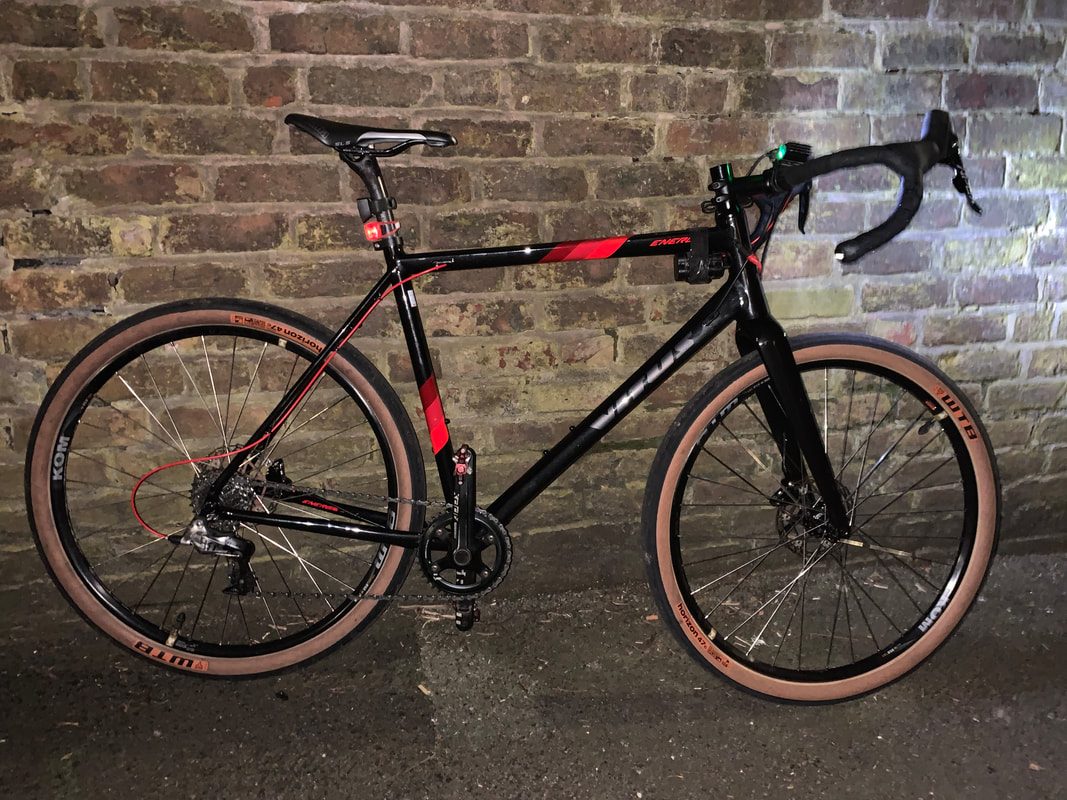 As a commuter it probably really wasn’t worth me teaching myself to build wheels, but I was curious as to how difficult it would be. My bike came with a relatively heavy set of WTB i23’s, and WTB Cross Boss tyres. Naturally I wanted something a little lighter but also something that would roll a little faster on the road and also be tubeless. The easy thing here would have been to just swap tyres, but I figured having two sets of wheels with two different tyres, let’s say winter and summer means less mess and less wastage of sealant. And then this happened…
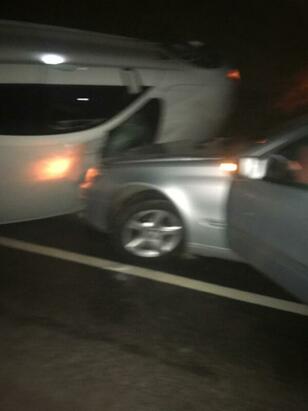
We were out on our usual group ride, one impatient driver decided to overtake us straight into the path of an oncoming car. Miraculously it was only me that came off my bike with some scrapes a bent rear mech hanger, torn seat, broken wheel and scrapes and aches. I still can’t believe how lucky we were but anyway I digress, is wheel building worth it, well I did have a spare set of wheels so I could swap those over no problem, that meant I could get back on my commute the next week which was great, but also because I have a perfectly good hub still I can simply rebuild my wheel onto a new rim. Well theoretically I could anyway, the only problem being I couldn’t find a 29inch WTB ST i-23 rim anywhere, and I don’t know why but I can’t bring myself to ride with two different rims, it just doesn’t seem right, so I’ve done what any sane person would do. Buy some 650b rims and new tyres and build some Road + wheels. Is wheel building worth it, well at the time of writing eBay are selling a set of identical wheels to those I’m building for £199, my build cost reusing the hubs is coming in at £58 not factoring in time. Add another £60 if I got new hubs from Aliexpress i’d still be saving £80 which is a pretty good saving. Will my wheels be as true and as strong, well with practice they will be and I’m not under any real time constraints to complete it, and I also have the added skill to be able to true my wheels or friends wheels if I need to. But, and there is a but whilst it is a fun experience building your own wheels if you’re into that kind of thing, unless you’re willing to sacrifice your time to save money (like I am) just learning the basics of and principles of building and truing wheels should suffice that way you can repair your own wheels if you need to, and if you have a Local Bike shop you can pop in to there and discuss hand built wheels and I’m sure you could get some custom made wheels for a decent price and professionally hand built, and a preferred option for many.
For those interested in changing from 700 to 650b, my first impressions after riding 40 miles on them, 650bx47c feel very different, in fact the exact opposite on my 700x30c wheels, I was much more comfortable and felt I was riding faster over the first half of my commute a muddy and lumpy old railway line, but when I hit the road and was getting out of the saddle accelerating from lights it was more effort, and I didn't like the feel of the front tyre compressing. My 700c wheels make the ride less comfortably on the first half but not slow on the second half. Overall the moving time of the commute both there and back was about the same. Once I've played with the tyre pressures I might be able to shave some time off the first half of the commute which is always a little rougher.
Whilst I like the wheels and will keep using them, there are other things to consider, if you use mudguards you'll need bigger ones, I've managed to bend mine to create clearance but the tyres are wider than my wheels so i still got a bit muddy, I think the tyres will come into their own on more gravel orientated rides, but I suspect taking them up into the Peaks is really going to prove an effort. I'm hoping though if I persevere with them they'll act a bit like training wheels and come the summer the Triathlons and Sportifs I've entered will feel easier when I put on the 700c's? |
Mike GaskellI started commuting around May 2017, mainly to save the £45 a week train fare and get ready for the Dunwich Dynamo. Archives
August 2022
CategoriesCategories |


 RSS Feed
