|
Pedals, right, super exciting topic, there are way too many varieties, variations and styles to choose from, each with their own positives and negatives. I’ve been through a couple, but the types of riding I do, is more suited to MTB pedals. After the long ride last summer I decided the effort needed for maintenance on the Crankbrother Eggbeater style pedal was way too intensive, and also I’d rounded an end cap bolt which resulted in having to drill the bolt and then reaching the thread in the pedal…. That was just me being lazy and careless though. Anyway, I decided enough was enough and invested in a set of Shimano XT and XTR pedals for my trainer and gravel bike, and off I headed merrily pedalling away for a couple of months until winter that was. And that’s where the real frustration came, riding in snowy and muddy conditions, the pedal would get filled with compacted snow or mud and I couldn’t clip in, that coupled with slippy pedal conditions feet coming off the pedals became a pain and pedal slips painful at points. So I sucked it up and decided to come back with my tail between my legs to Crankbrother eggbeaters, and that’s the point of this post really to talk you through servicing alternative parts, the pitfalls and the benefits of the pedals. The Benefits
 The Negatives
But that aside, servicing and even rebuilding the pedals is a 5 min job on each side (probably even less than that really) and arguably whatever the pedal is you should probably try and service after a spell of bad weather, but I know people with Shimano SPDs decades old that haven’t been serviced. Anyway the Eggebater Pedal rebuild. You can go easy and just buy the £20 rebuild kit it contains bearing, bushing, seals and caps and the all-important 10.5mm rod for knocking out the crank sim bushing. Or you can do what I do and go cheap, and upgrade. I now buy in HK1012-2RS needle bearings (as found in the Eggbeater 11s) and outer side enduro bearings, therefore improving the overall quality of the pedal internals. the tables below give you a side by side comparison. teh cheaper rebuild kit comes with a glide bearing instead of a needle bearing. If you think the seals have had it, it's worth going for the Crankbrother rebuild kit, but if you think you'll just need one or two new bearings it's pretty cheap to get them individually. The items listed in red under "upgrade kit" I've not had to touch as they're either not used, or i've not had to change since owning the pedals
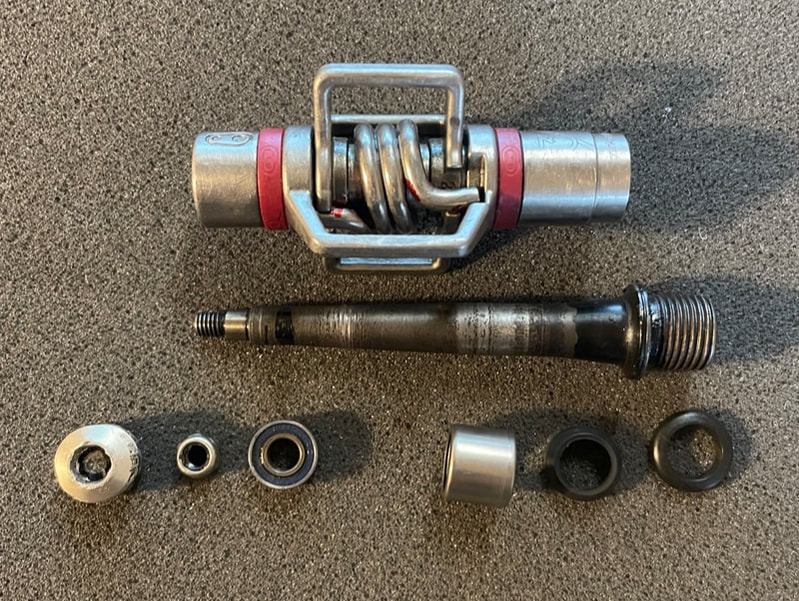
I’ve linked at the bottom of the blog the Crankbrothers instructions page on dropbox, they have a nice step by step guide, but to sum up in a couple of paragraphs So what tools do you need?
That's it, for the basic service, remove the end cap and the internal bolt and everything slides off, taking note of the orientation of the seals (there is an inner double seal and then outside of that a single seal. clean it, inspect the bushing and outer bearing for wear and damage, smother it in grease and then slide back together again It’s that simple. If you want to go one step further you can replace the bushing, either like for like or with a needle bearing, this is where it gets ever so slightly complicated as the tolerance is very narrow. You find a tool that is exactly 10.5mm wide and gently tap through the pedal outside in to then knock the bushing out. It is very tight and it might feel like it’ll never come out again but a few taps and the rod and bushing will come out. Reassembly is the reverse, grease the new bearing and bushing then with a 10mm socket gently tap the new bearing into place, if you have a bearing press you could use this but you don’t need to. Gently (gently being the operative word as you’re dealing with bearing) tap the new bushing in until it won’t go anymore. Slide the two washers onto the axle, smother in grease, push the axle through seat the seals into the inside of the pedal, attach bearing to outside of the pedal, nut on top of that then reattach the end cap. Your pedals should now feel smooth and snug. I am a big fan of Eggbeaters they do work for me, they sadly aren’t fit and forget, and when I have forgotten I have had failures. If you are someone who shies away from servicing your own bike I’d say they’re probably not the best pedals for you, but if you like to strip your bike down every couple of months and give it some TLC you might also appreciate the mud clearing and performance of these pedals. Useful Links
Crankbrothers - Pedal Refresh Kit Eggbeater 3 - Exploded View All Crankbrothers Technical Documents for pedals Bearing dimensions Outer bearing (furthest away from the crank arm - 6mm x 13mm x 5mm 2 Rubber seals (2RS) Inner bearing (closest to the crank arm) - 10mm x 14mm x 12mm* I purchase my bearings from Budgetbearings.co.uk * This is slightly longer than the glide bearing but are the dimensions of the Eggbeater 11 pedals and I've run for a long time.
0 Comments
Your comment will be posted after it is approved.
Leave a Reply. |
Mike GaskellI started commuting around May 2017, mainly to save the £45 a week train fare and get ready for the Dunwich Dynamo. Archives
August 2022
CategoriesCategories |
 RSS Feed
